Before starting with the mobile forensics, let’s see some definitions provided by the most important organizations in the field:
Meaning of Mobile Forensic
- For legal purposes, the utilization of scientific methodologies to recover data stored by a cellular device
SWGDE (Scientific Working Group on Digital Evidence)
- *Mobile device forensics is the science of recovering digital evidence from a mobile device under forensically sound conditions using accepted methods*NIST (National Institute of Standards and Technology)
Definition
A Mobile Device is a portable computing device such as a smartphone, tablet, or laptop that can connect to the internet and run applications.
Mobile devices have become an integral part of our everyday routines, storing a significant amount of personal and sensitive data. This data can play a crucial role in criminal investigations, civil litigations, and corporate disputes. Mobile forensics is the field dedicated to retrieving digital evidence from mobile devices using accepted methods and ensuring the integrity of the investigation process.

Over time, mobile devices have evolved from basic feature phones to advanced smartphones, which now function as powerful computing devices with a wide range of capabilities.
| Device | Years | Features |
|---|---|---|
| Feature phones | Early 2000s | Phonebook, Call History, SMS Messages, Melodies |
| First smartphones | 2000 - 2007 | Phonebook, Call History, SMS/MMS Messages, Calendar, Notes/Tasks, Camera (Photo / Videos), Emails, Web Browsers |
| Modern smartphones | 2007 - 2024 | Phonebook, Call History, SMS/MMS Messages, Calendar, Notes/Tasks, Camera (Photo / Videos), Emails, Web Browsers, GPS, Health, Third Party Apps (Chats, Social Network, etc.) |
Considering the entire world, the most popular mobile operating systems in 2024 are Android (72.5%) and iOS (27.5%). Considering only the European market, Android has a market share of 66.5%, while iOS has a market share of 32.6%. The remaining 0.9% is shared among other operating systems, like Windows devices.

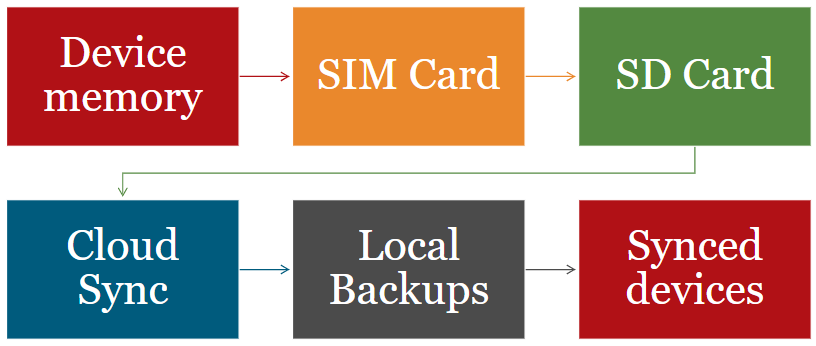
In a mobile device, there are many location where a forensic investigator can find data:
Mobile Forensics and Encryption
In the era before smartphones, mobile devices did not have strong encryption mechanisms, making user data susceptible to unauthorized access. Even Android and iOS did not initially use encryption.
However, encryption has now become a standard feature in both Android and iOS devices. Modern smartphones utilize different encryption techniques to safeguard sensitive information stored on the device.
Encryption in Android
Encryption is the process of encoding all user data on an Android device using symmetric encryption keys. Once a device is encrypted, all user-created data is automatically encrypted before committing it to disk and all reads automatically decrypt data before returning it to the calling process.
Android has two methods for device encryption:
- Full-disk encryption (FDE): The process of encoding all user data on an Android device using an encrypted key. FDE was introduced in Android 4.4 and enforced starting from Android 5 and 6. Only devices launched with Android 9 or lower can use FDE. Devices launched with Android 10 or higher must use file-based encryption. Android 10-12 support FDE only for devices that upgraded from a lower Android version. Android 13 removes support for FDE entirely.
- File-based encryption (FBE): Allows different files to be encrypted with different keys that can be unlocked independently. Android 7.0 and higher support FBE. All devices launching with Android 10 and higher are required to use file-based encryption. File-based encryption enables a new feature called Direct Boot, that allows encrypted devices to boot straight to the lock screen. An FBE device has two storage locations available to applications: Credential Encrypted (CE) and Device Encrypted (DE).
| FDE | FBE |
|---|---|
| Old “physical” methods are not viable (JTAG, Chip Off, ISP) | Old “physical” methods are not viable (JTAG, Chip Off, ISP) |
| Password to decrypt is fixed (“default_password”) | Each file has its own encryption key, making it impossible (?) to recover deleted files (encryption key is wiped when a file is deleted) |
| A fully booted FDE Android device is decrypted | Device Encrypted files can be accessed without the need of knowing the passcode |
| PIN/Pattern is just like a screen lock | User passcode is tied to Credential Encrypted files, so you need to know/attack the PIN / Pattern to decrypt |
| Recovering of deleted files is technically possible | |
| If Secure Startup is enabled then you need to know/attack the PIN / Pattern |
In Android versions prior to 5, no encryption mechanisms were in place, so the passcode functioned solely as a screen lock, providing minimal security. Data extraction from devices running these versions was relatively simple, and techniques like JTAG (Joint Test Action Group) and ChipOff could be employed effectively to retrieve data. Physical memory dumps were achievable, and it was possible to recover deleted files from these devices.
With the advent of Android versions 7 to 9, the security landscape improved with the introduction of full disk encryption. While the passcode still primarily served as a screen lock, the introduction of Secure Startup offered an additional layer of security by requiring the passcode at boot time to decrypt the storage. However, even without Secure Startup, data extraction via JTAG/ChipOff methods became impractical due to encryption. Nonetheless, physical memory dumps were still feasible, and deleted files could still be recovered, given the encryption model in place.
Beginning with Android 10, the operating system transitioned to file-based encryption (FBE), which provided more granular security by encrypting individual files rather than the entire disk. In this model, the passcode was integral to the encryption process, used to generate the keys that encrypt specific files. As a result, the ability to extract data using JTAG/ChipOff methods remained impossible. While full file system dumps could still be performed, the ability to recover deleted files was significantly hindered or entirely eliminated due to the nature of file-based encryption and the way data is managed and erased on these devices.
iOS Encryption
Apple employs a robust security technology known as Data Protection to safeguard data stored on devices equipped with an Apple System on Chip (SoC), such as the iPhone, iPad, Apple Watch, and Apple TV. This technology is particularly significant in environments where sensitive data must be protected without compromising the device’s functionality.
Data Protection ensures that user data is securely encrypted while allowing the device to perform essential tasks like responding to incoming phone calls or notifications. This dual functionality is crucial for maintaining both security and usability. Data Protection is deeply integrated into the device’s architecture, leveraging the hardware encryption capabilities inherent in Apple’s custom SoCs. Data Protection is applied automatically to certain system applications, including Messages, Mail, Calendar, Contacts, Photos, and Health data. These apps contain sensitive personal information, making encryption essential. Additionally, third-party applications benefit from this protection without requiring any additional configuration by the developer, ensuring a consistent security standard across all apps on the device.
The core of Data Protection lies in its use of a hierarchical key structure. This hierarchy is designed to manage encryption keys effectively, enabling different levels of data accessibility and security. The encryption process is tightly integrated with the device’s hardware, utilizing a unique identifier stored in the Secure Enclave — a separate processor dedicated to security tasks — to generate encryption keys that are unique to each device.
A critical aspect of Data Protection is that it operates on a per-file basis, meaning each file stored on the device is assigned to a specific security class. These classes dictate the accessibility of the file based on the state of the device, particularly whether the class keys have been unlocked. When a new file is created, the application that creates the file assigns it to one of the available Data Protection classes. These classes determine when and how the data within the file can be accessed, typically based on the device’s lock state. For example, some files might be accessible only when the device is unlocked, while others might be available even when the device is locked but still able to perform basic functions. Apple’s Data Protection defines several classes, each with distinct policies for data accessibility:
- Complete Protection (NSFileProtectionComplete): Data is accessible only when the device is unlocked. This class offers the highest level of security, as the decryption keys are removed from memory when the device is locked.
- Protected Unless Open (NSFileProtectionCompleteUnlessOpen): Data remains accessible if the file was open before the device was locked. This is useful for scenarios where data needs to remain accessible while an app is running.
- Protected Until First User Authentication (NSFileProtectionCompleteUntilFirstUserAuthentication): Data is accessible after the device is first unlocked after a reboot. Once unlocked, the data remains accessible until the next reboot.
- No Protection (NSFileProtectionNone): Data is accessible regardless of the device’s state. This class is typically used for data that does not require encryption, such as temporary files.
| Class | Protection Type |
|---|---|
| Class A: Complete Protection | NSFileProtectionComplete |
| Class B: Protected Unless Open | NSFileProtectionCompleteUnlessOpen |
| Class C: Protected Until First User Authentication (MacOS uses a volume key to recreate FileVault protection characteristics) | NSFileProtectionCompleteUntilFirstUserAuthentication |
| Class D: No Protection (not supported in macOS) | NSFileProtectionNone |
Device State
In mobile device forensics, understanding the different states of a device is essential for assessing both accessibility and security. These states significantly influence the methods and tools forensic investigators use to retrieve data. Here’s a detailed breakdown of the primary device states and their implications for forensic investigations:
- No Passcode (Rare): Occasionally, a mobile device might not be secured with a passcode. This scenario is relatively uncommon but simplifies data extraction since no authentication is required to access the device. Forensic investigators can directly access and retrieve data from such devices without needing to bypass any security measures.
- Passcode Known: When the passcode for a device is known, data extraction becomes straightforward. With the passcode, investigators can unlock the device and use various forensic tools to extract a wide range of data, including texts, call logs, photos, and application data. The known passcode facilitates a more direct approach, reducing the complexity of the data retrieval process.
- Turned On, Passcode Unknown (AFU - After First Unlock): In this state, the device is powered on and has been unlocked at least once since its last reboot. Although the passcode is not known, the device is in a more accessible state compared to when it is completely powered off or locked from the start. The fact that it has been unlocked at least once means that the encryption key used for data protection might be available in the device’s volatile memory. Forensic investigators can exploit this by using specialized techniques and tools to extract data, as the device might have residual data in its memory that is more readily accessible.
- Turned Off, Passcode Unknown (BFU - Before First Unlock): When a device is turned off or has not been unlocked since its last reboot, it is in the BFU state. This state presents a greater challenge because the device’s data is protected by encryption, and the passcode is required to access the decryption key. In this state, forensic investigators face significant hurdles, but there are still advanced techniques available. For instance, some tools can exploit vulnerabilities in the device’s firmware or use brute-force methods to attempt to unlock the device. Additionally, there may be limited data that can be extracted from non-volatile memory or from backups that might have been created prior to the device being turned off.
Device Identification
To effectively identify a device, it is essential to understand and locate three key identifiers: the model number, IMEI (International Mobile Equipment Identity), and serial number. Each of these identifiers plays a crucial role in distinguishing and verifying the device’s authenticity and warranty status.
The model number specifies the exact model of the device and is typically found on the packaging box or within the device’s settings menu. The IMEI number, a unique 15-digit code assigned to each mobile device, aids in tracking and identifying the device, especially for security purposes and warranty checks. The serial number, another unique code assigned by the manufacturer, is used to track the device’s production and servicing history.
Identifiers can be located in several places depending on the device’s design. For many devices, especially older models, you can find these identifiers on the rear of the device or underneath the battery. It is important to exercise caution when removing the battery to avoid damaging internal components. In modern devices, which often lack removable batteries, identifiers may be found in the SIM card tray or printed on a label on the back of the device. If you have access to the device, you can also retrieve the IMEI number by dialing *#06# on the device’s dialer. For Android devices, navigate to Settings → About Phone → Status → IMEI Information to find the IMEI number. On an iPhone, go to Settings → General → About and scroll down to locate the IMEI number.
To verify the device’s IMEI number and other details, you can utilize various online resources. Websites such as IMEI.info, Numberingplans.com, Phonedb.net, IMEI.org, and IMEIPro.info offer services to check IMEI numbers and provide detailed information about the device.
For warranty verification, you can visit the manufacturer’s website, where most companies provide a warranty check tool that allows you to enter the serial number or IMEI number to verify the device’s warranty status. Alternatively, you can contact the manufacturer’s customer support with your device identifiers to obtain warranty information.
Device Connection for Data Extraction
To successfully extract data from a device, effective communication with it is essential. Here’s a detailed breakdown of common methods used for this purpose:
- USB Connection: This is the most straightforward method, assuming the device is operational. A USB connection provides a direct and reliable pathway for data transfer between the device and a computer or other data retrieval equipment. This method is widely used due to its ease of use and compatibility with various devices.
- Physical Access for Test Points: In some cases, the device might need to be physically opened to access internal test points. Test points are specific locations on a circuit board where you can connect diagnostic equipment to gather data. This approach is often necessary when the device’s external interfaces (such as USB or Wi-Fi) are not functional or when more detailed internal data is required.
- Alternative Wireless Methods: If a direct connection isn’t possible or practical, you can utilize wireless methods such as:
- Wi-Fi: Many modern devices support Wi-Fi connectivity, which allows for wireless data transfer. This method is useful when devices are designed to communicate over a network or when you need to avoid physical connections.
- Bluetooth: Similar to Wi-Fi, Bluetooth is another wireless communication method that can be used for data extraction. It is often used for short-range communications and is common in consumer electronics.
- SD Card: Some devices use SD cards for data storage. Removing the SD card and reading it with a card reader can be a simple way to extract data, especially in devices where direct connections are not feasible.
Data Acquisition Techniques
Data Extraction When Passcode is Known
When the passcode of a mobile device is known, various methods can be used to extract data, differing between Android and iOS systems.
For Android devices, Media Transfer Protocol (MTP) facilitates the transfer of media files, such as photos and videos, from the device to a computer. Content Providers, which are interfaces for accessing structured data from applications, can also be utilized to retrieve information like contacts and calendar events. Additionally, Android Debug Bridge (ADB) offers versatile data extraction methods. Using ADB Backup, a comprehensive backup of the device’s data can be created and analyzed. Dumpsys provides detailed system information and service status, while Bugreport generates extensive diagnostic reports that include system logs and other critical data.
On iOS devices, iTunes Backup enables the creation of backup files containing device data, which can then be analyzed using forensic tools. Apple File Conduit (AFC) allows access to the device’s file system, providing the ability to extract specific files. CrashReporter, through Sysdiagnose, produces diagnostic reports with logs and system information. The Lockdown service offers additional access to device-related information, aiding in data extraction and management.
Data Extraction When Passcode is Unknown
When the passcode is unknown, extracting data from mobile devices becomes more complex and typically requires exploiting vulnerabilities.
For Android devices in the After First Unlock (AFU) state, an exploit is needed to retrieve encryption keys from RAM. This access enables extraction of a broader range of data, including the Full File System, as some encryption keys are stored in RAM after the device has been unlocked. Conversely, in the Before First Unlock (BFU) state, exploiting vulnerabilities to brute force the passcode may allow for Full File System extraction if successful. Even if brute forcing fails, certain data can still be accessed, such as Device Encrypted (DE) files.
On iOS devices, extraction in the AFU state is possible for Class C and Class D files. These files are accessible because the device is unlocked, and encryption keys are available. In the BFU state, brute forcing the passcode may lead to Full File System extraction if successful. If brute force attempts are unsuccessful, partial extraction remains feasible, particularly for Class D files, which include temporary or less sensitive data.
Device Analysis
When analyzing data extracted from mobile devices, it is crucial to understand the complexities and limitations associated with different types of data. Both Android and iOS platforms employ sophisticated mechanisms to store and protect data, but these protections also impose constraints on what can be analyzed.
On Android devices, certain types of data are protected through encryption, making them inaccessible for standard forensic analysis. For instance, Wallet data, which includes information stored in digital wallet applications, is encrypted for security purposes. Similarly, Cache data, which consists of temporary files and data caches, is encrypted to prevent unauthorized access. Frequent data related to frequently used apps or services may also be encrypted, limiting access for forensic tools.
iOS devices also use encryption to protect various types of data. Health data, which includes sensitive health-related information, is secured and encrypted to ensure user privacy. Passwords saved within the device are encrypted, preventing unauthorized users from accessing them. Additionally, Wallet data in the Apple Wallet is encrypted to safeguard against unauthorized access.
To effectively analyze data from mobile devices, various tools are available, each with different functionalities, costs, and data access capabilities. Free and open-source tools include options such as aLEAPP, Andriller, iLEAPP, APOLLO, ArtEx, ios_apt, iTunes Backup Reader, and Sysdiagnose Script. Each of these tools has specific strengths, such as aLEAPP’s focus on extracting and analyzing data from iOS and Android devices, or iTunes Backup Reader’s capability to extract data from iTunes backups of iOS devices.
Validation
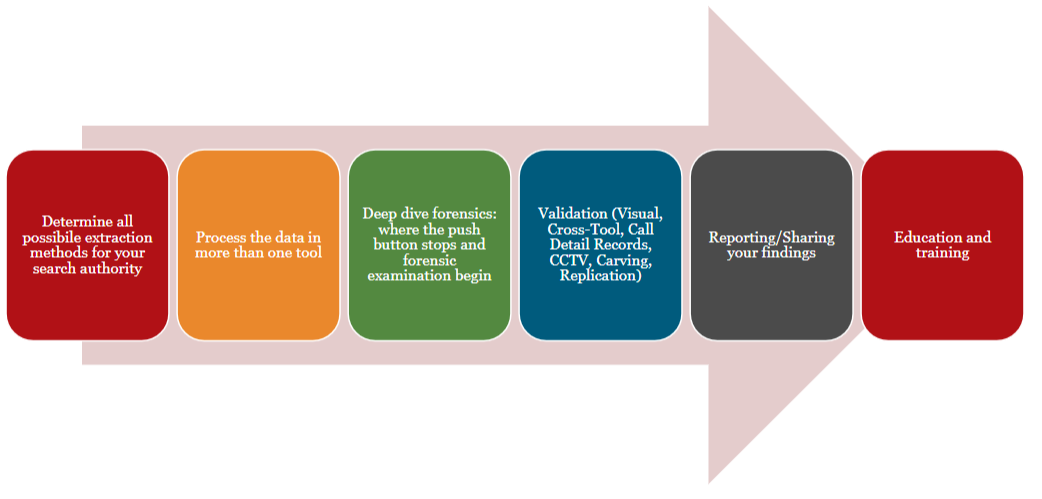
- Identifying Extraction Methods: Begin by identifying all potential methods for data extraction based on the scope of your search authority. This includes understanding different types of data sources and the appropriate extraction techniques for each. For example, extraction methods may vary depending on whether you’re dealing with mobile devices, computer systems, cloud storage, or physical media. Familiarize yourself with various tools and techniques, such as logical extraction, physical extraction, and file system extraction, to ensure that you can effectively obtain data from diverse sources.
- Utilizing Multiple Tools for Data Processing: To ensure a thorough analysis, employ a range of forensic tools to process the extracted data. Different tools offer varying capabilities and may specialize in different types of data or file systems. By using multiple tools, you can cross-verify results and gain a more comprehensive understanding of the data. This may include tools for disk imaging, file analysis, and data recovery, among others.
- Conducting In-Depth Forensic Examination: Go beyond automated processes by performing a detailed forensic examination. Automated tools can streamline the analysis process, but they may not capture every detail or nuance. Manual examination involves scrutinizing data at a granular level, which can uncover additional evidence that automated tools might overlook. This step may include reviewing metadata, examining hidden files, and analyzing data artifacts.
- Validating Findings: To ensure the accuracy and reliability of your findings, validate them through several methods:
- Visual Inspection: Manually review the data and evidence to confirm its relevance and accuracy.
- Cross-Tool Comparison: Compare results from different forensic tools to verify consistency and identify any discrepancies.
- Analysis of Call Detail Records (CDRs): Examine CDRs for additional context and corroboration of findings.
- CCTV Footage: Review video footage if available, to support or refute data findings with visual evidence.
- Data Carving: Use data carving techniques to recover deleted or fragmented files that may be relevant to the investigation.
- Replication: Create forensic copies of the data and test your findings on these copies to ensure that your results are reproducible and not an artifact of the original data.
- Preparing Comprehensive Reports: Document your findings in detailed reports that outline the methodologies used, the evidence collected, and the conclusions drawn. Comprehensive reports should include an executive summary, a detailed analysis of the data, and any supporting evidence. Ensure that the report is clear, concise, and structured in a way that makes it easy for stakeholders to understand the findings.
- Continuous Education and Training: Stay current with advancements in forensic technology and techniques by engaging in ongoing education and training. This includes attending workshops, participating in webinars, and obtaining certifications relevant to forensic analysis. Continuous learning helps you stay ahead of emerging trends and ensures that your skills remain sharp and up-to-date.
Reporting Guidelines
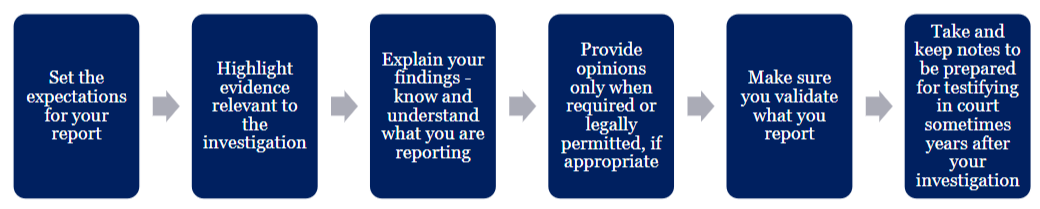
- Define Scope and Objectives: Clearly articulate the purpose of the report and what it intends to achieve. Specify the boundaries of the investigation, including what is and isn’t covered. For example, if the report pertains to a financial audit, outline whether it addresses only specific transactions, periods, or departments.
- Emphasize Relevant Evidence: Focus on presenting evidence that directly pertains to the core issues of the investigation. Include data, documents, and other materials that substantiate the investigation’s key points. For instance, if analyzing a company’s financial health, prioritize evidence such as financial statements, transaction records, and audit trails.
- Explain Findings Clearly: Articulate your findings in a detailed and comprehensible manner. Ensure that the report provides a thorough understanding of the information presented. Use charts, graphs, and summaries to make complex data more accessible. For instance, if your findings indicate irregularities in financial reporting, detail how these irregularities were identified and their implications.
- Provide Opinions with Caution: Offer expert opinions only when they are necessary for understanding the report’s conclusions or when legally permissible. Opinions should be based on factual evidence and professional judgment. Avoid speculative or unsupported conclusions. For example, in a legal investigation, opinions might be offered regarding the implications of evidence on the case but should be grounded in factual analysis.
- Verify and Validate Information: Ensure that all information presented in the report is accurate and reliable. Cross-check data from multiple sources and verify facts before inclusion. This may involve corroborating evidence with external records or consulting with experts. For example, if the report includes statistical data, confirm its accuracy through independent calculations or validation against source data.
- Maintain Detailed Notes: Keep comprehensive notes throughout the investigation process. These notes should document decisions, methodologies, and observations to support potential future court testimony. Detailed documentation can provide crucial context and support the credibility of your report. For instance, if called to testify about the findings, having detailed notes can help substantiate the investigative process and the conclusions drawn.