An Introduction to Game Engine Architecture and Programming
This chapter introduces the fundamental principles of game engine programming, establishing the conceptual framework that underpins interactive digital entertainment. The primary objective is to deconstruct the core operational mechanism common to all games—the game loop—and to rationalize the critical role of modern game engines, such as Unity, in abstracting this complexity. A comprehensive understanding of these foundational concepts is essential for appreciating the script lifecycle within the Unity engine and for developing the disciplined coding practices required for professional software development.
The Architectural Core
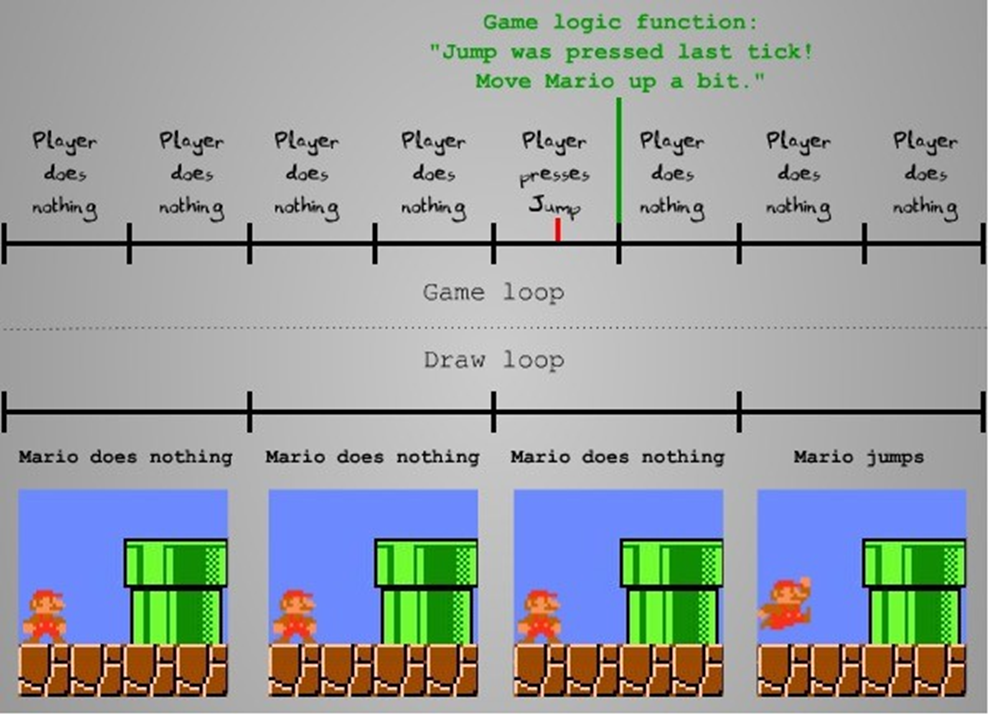
At its most fundamental level, a video game operates as a real-time, continuous simulation executed within a cyclical process known as the game loop. This loop constitutes the heart of the application, responsible for orchestrating the three primary tasks that create an interactive experience: processing user input, updating the game’s internal state, and rendering a visual representation of that state to the display. To achieve the illusion of fluid motion and responsiveness, this cycle must execute at a high frequency, typically ranging from 30 to 60 times per second, a metric commonly referred to as frames per second (FPS).
The operation can be bifurcated into two distinct, yet interdependent, processes.
The first is the logical update, or the game loop proper, where the program polls input devices, executes game logic (such as artificial intelligence or player-character state changes), and resolves physical interactions.
The second is the draw loop, or rendering pipeline, which is solely concerned with translating the current state of the game world into a two-dimensional image to be displayed. For instance, upon detecting a ‘jump’ input during a logic tick, the game state is modified to alter the character’s vertical position. The subsequent rendering cycle will then generate a new frame reflecting this updated position.
It is crucial to note that the game state may evolve independently of direct player input—for example, through autonomous non-player character (NPC) behavior or environmental physics—necessitating a continuous refresh of the visual output even in the absence of user interaction.
This entire process can be conceptualized as a state machine that transitions through a formal sequence.
graph LR
 1[Load Game World]
 2[Check User Input]

 8[Render Scene]

 subgraph 3[Update World State]
  4[Update Game Logic]
  5[Positional Logic]
  6[Collision Detection]
  7[Collision Resolution]

  4 --> 5 --> 6 --> 7
 end

 1 --> 2 --> 3 --> 8 --> 2
Upon initialization, the game world is loaded by allocating memory for all necessary assets, including models, textures, audio, and scripts. The program then enters the main loop, which persists until a termination condition is met. Within each iteration, the system first checks for user input, then updates the world state based on this input and other programmatic logic, and finally renders the scene.
In a simplified pseudocode representation, this imperative structure is elegantly captured as:
The UpdateWorldState() function is the most complex phase, encompassing the execution of high-level game rules, the calculation of object kinematics, the detection of spatial overlaps between objects (collision detection), and the subsequent programmatic response to these events (collision resolution), such as applying principles of momentum transfer in a physics-based simulation.
Custom Engines vs. Commercial Frameworks
Historically, game development necessitated the construction of the entire software stack from first principles. Writing a minimal application to render a single primitive, such as a triangle using a low-level graphics API like OpenGL, involves significant boilerplate code for window initialization, context creation, and managing the render loop. Extrapolating this effort to a full-featured game—requiring custom-built systems for physics simulation, audio processing, animation, input handling, and more—represents a monumental engineering undertaking. While academically valuable, this approach is often commercially unviable for most contemporary projects.
To address this challenge, the industry has widely adopted the use of game engines.
Definition
A game engine is a sophisticated software framework that provides a comprehensive suite of tools and reusable code libraries designed to abstract the low-level complexities of game creation.
By providing pre-built, optimized systems for rendering, physics, audio, animation, networking, and artificial intelligence, engines allow developers to concentrate on implementing the unique gameplay logic and creating the artistic assets that define their product.
The choice of an engine is a critical project decision, involving considerations such as its programming language (e.g., C# for Unity, C++ for Unreal Engine), its licensing model (proprietary vs. open-source), and its suitability for the target genre and platforms.
The Unity IDE
The Unity Editor serves as the primary interface for game development within the Unity engine. It is an integrated environment that facilitates a visual, component-based approach to constructing game worlds. A key feature of the editor is its dual-view paradigm, which separates the abstract construction space from the final player perspective.
The Scene View offers a decoupled, non-player perspective of the game world, allowing developers to freely manipulate objects, place assets, and design levels without the constraints of the in-game camera.
In contrast, the Game View renders the scene exclusively through the lens of the active in-game camera, providing an exact representation of what the player will experience during gameplay.
Unity Event-Driven Model
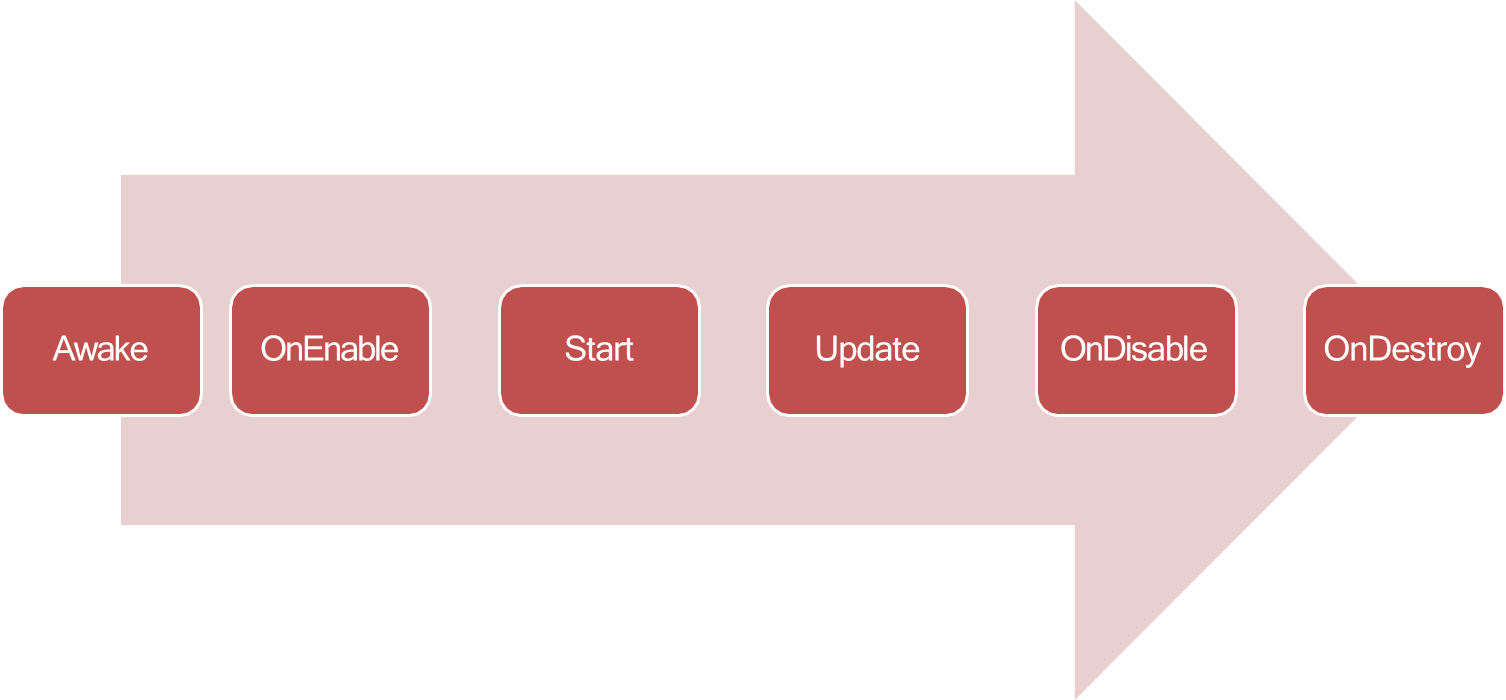
Unity abstracts the raw, monolithic game loop into a more manageable, event-driven architecture. Developers do not write a single, continuous while loop. Instead, they create scripts (as C# classes inheriting from MonoBehaviour) and attach them to GameObjects. Unity’s engine then automatically invokes specific functions within these scripts at predetermined points in its internal game loop. This system of event functions constitutes the Unity scripting lifecycle.
The initialization phase consists of several key events.
Awake() is called once when a script instance is loaded, regardless of whether the script is enabled, making it ideal for establishing references between components.
OnEnable() is called whenever a GameObject or script component becomes active, which occurs at startup and any subsequent time it is re-enabled.
Start() is called once per script’s lifetime, but only if the component is enabled and occurs just before the first frame update. This deliberate ordering ensures that all Awake() calls across all scripts are completed before any Start() functions are invoked, creating a predictable initialization sequence that prevents race conditions.
For frame-by-frame logic, Unity provides three distinct update functions.
Update() is called once per frame and is the primary location for most non-physics-based game logic, such as input handling and character control. The time between calls to Update(), accessible via Time.deltaTime, can fluctuate based on system performance. For physics-related calculations, FixedUpdate() is used. It is invoked at a consistent, fixed interval, independent of the frame rate, ensuring that physics simulations are deterministic and stable across hardware of varying capabilities. Finally, LateUpdate() is called once per frame after all Update() functions have completed. This is particularly useful for logic that must run after all other state changes have occurred, such as a camera-following script that needs to track a player character whose position was just modified in Update().
The lifecycle concludes with OnDisable() and OnDestroy(), which are called upon deactivation and destruction of the object, respectively, allowing for necessary cleanup operations.
Coding Conventions and Style
While functional code is the initial goal, its long-term viability in a professional or collaborative setting depends heavily on its readability and maintainability. Adherence to established coding conventions is not merely a stylistic preference but a fundamental principle of software engineering.
Consistent naming schemes, formatting, and architectural patterns ensure that code is predictable and comprehensible to other developers, as well as to the original author at a later date. As famously stated, code is written primarily for human interpretation.
Convention
Usage Example
Purpose
camelCase
maxHealthPoints
Local variables, method parameters
PascalCase
MaxHealthPoints
Classes, public fields, methods
snake_case
max_health_points
Rare in C#, used in UI Toolkit USS
kebab-case
max-health-points
Used in CSS and USS
Hungarian
strPlayerName, iScore
Legacy style, not recommended in Unity
In the context of a complex, multi-faceted project within an engine like Unity, neglecting these conventions can lead to an unmanageable and error-prone codebase.
Therefore, a disciplined approach to adopting the standard C# and Unity-specific style guides is not just recommended; it is an essential practice for any aspiring developer.
Identifier Names
Identifiers are the names you assign to types, members, variables, and namespaces. They should avoid special characters such as backslashes, symbols, or Unicode to maintain cross-platform compatibility. Descriptive and readable names are essential—clarity always trumps brevity.
Casing Styles
Different casing styles serve different purposes. CamelCase is used for local variables and method parameters, such as maxHealthPoints. PascalCase is applied to classes, public fields, and methods, like MaxHealthPoints. Snake_case and kebab-case are rare in C# but may appear in UI Toolkit USS or CSS contexts. Hungarian notation, like strPlayerName or iScore, is considered outdated and not recommended in Unity development.
Variables & Fields
Use nouns for variables to clearly represent entities or states, such as playerScore or enemyCount. Boolean variables should be prefixed with verbs to indicate their true/false nature—examples include isDead or hasPowerUp.
Avoid abbreviations unless you're working with mathematical expressions, where x, y, and z are acceptable.
Private member variables can be prefixed to convey their scope and type: m_speed for members, k_MaxLives for constants, and s_Instance for static variables. Public fields and properties should use PascalCase, while private variables and parameters follow camelCase.
It's also wise to avoid redundancy. For instance, within a class named Player, a member variable should be named Score rather than PlayerScore.
Constants
Constants should be prefixed with _ and use PascalCase, such as _MaxLives. Avoid redundant initializers like int score = 0; since fields are automatically initialized to their default values.
Enums
Enum names and values should use PascalCase. Choose singular nouns for enum names, like GameState, unless you’re working with bitwise enums marked with [Flags], which can be plural.
Classes & Interfaces
Class names should be PascalCase nouns or noun phrases, such as EnemyController. Interface names begin with a capital “I” followed by an adjective that describes functionality, like IMovable or IDamageable. MonoBehaviour class names must match their file names.
Methods
Method names should start with a verb or verb phrase, such as GetHealth or FindTarget. If a method returns a boolean, phrase it as a question—examples include IsGameOver or HasStartedTurn. Parameters should be formatted in camelCase, like CalculateDamage(int baseDamage).
Events & Handlers
Events should be named with verb phrases that clearly communicate the state change, such as DoorOpened or OpeningDoor. Use System.Action for flexible event signatures. Event methods should be prefixed with “On”, like OnDoorOpened, and handlers can use the subject prefix, such as GameEvents_DoorOpened.
Namespaces
Namespaces should use PascalCase and reflect the folder structure of your project. Examples include MyGame.AI or MyGame.UI. Use using directives to simplify access and avoid repetitive typing.
Project Structure
A Unity project’s structure is crucial for maintainability, scalability, and team collaboration. Following established conventions for folder organization and naming ensures consistency and makes it easier for anyone (including your future self!) to navigate and understand the project.
The general principle is to keep your main Assets folder tidy and well-organized, typically using a top-level structure that separates content types or features.
Folder Name
Content Type
Description
ProjectName
Core Game Logic
Contains the project-specific code and core assets not sourced externally. Often used as a top-level container to distinguish your work.
Art
Visuals & Graphics
All 2D and 3D assets, textures, materials, and imported models.
Audio
Sound
Music, sound effects, and ambient sounds.
Code (or Scripts)
Programming
All C# scripts. Can be further divided (e.g., Code/Player, Code/UI).
Materials
Shaders & Textures
All Material assets that define how meshes are rendered.
Prefabs
Templates
Reusable game objects that are instantiated in scenes (e.g., player, enemies, power-ups).
Scenes
Levels
All your game scenes (levels, menus, etc.).
Shaders
Rendering
Custom shaders (ShaderLab or Shader Graph assets).
Settings
Configuration
Configuration assets like Scriptable Objects for game data, Input Settings, or custom configuration files.
ThirdParty (or Plugins)
External Assets
Imported assets from the Unity Asset Store or external libraries. Note: Store assets should ideally be kept in their own vendor folder to avoid conflicts.
A good practice is to create inside the Asset folder a sub-direction with the name of your project, to differentiate your own work from third-party assets. This is especially important in larger projects or when using multiple packages from the Asset Store, as it prevents naming collisions and keeps your custom scripts easily identifiable. The same thing applies the Resources folder, to store (for example) prefabs or Scriptable Objects that need to be loaded at runtime.
Colliders
For a game world to be interactive, its constituent objects must be able to detect and respond to one another’s presence. Unity’s physics engine facilitates this through the Collider component.
Definition
A Collider is an invisible component that defines a geometric volume for a GameObject, serving as its physical representation for the purposes of collision detection, raycasting, and other spatial queries.
This volume is not necessarily a precise match of the object’s visible mesh. In practice, using simplified primitive shapes—such as a BoxCollider, SphereCollider, or CapsuleCollider—is a standard optimization technique. These primitives are computationally far less expensive for the physics engine to process than a complex MeshCollider, and for many applications, the approximation is sufficient to create a believable physical interaction for the player.
Collider Type
Best Used For
Performance
BoxCollider
Rectangular objects (crates, walls, platforms)
Excellent
SphereCollider
Round objects (balls, planets, bubbles)
Excellent
CapsuleCollider
Characters, pills, cylindrical objects
Excellent
CylinderCollider
Pillars, trees, poles
Very Good
The Collision Interaction Matrix
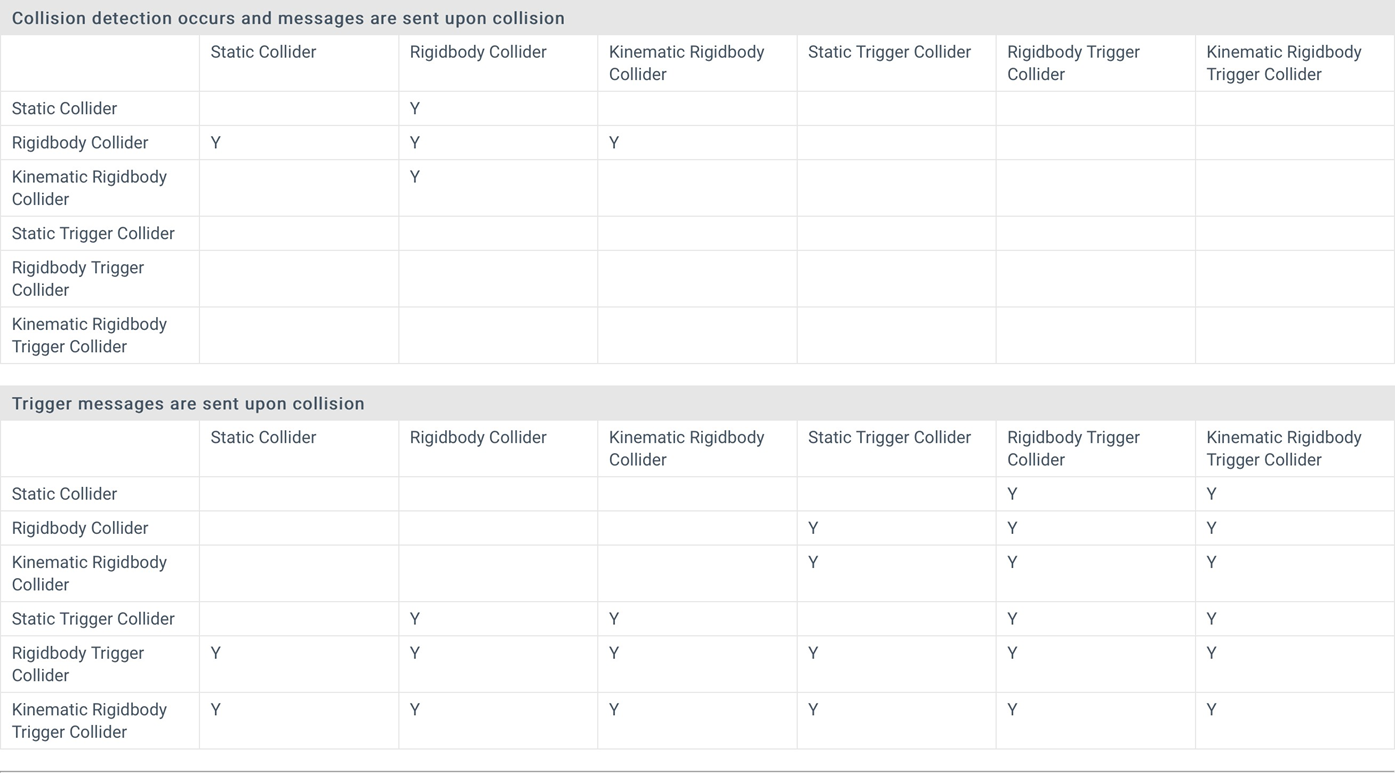
The outcome of an interaction between two objects is determined by the configuration of their Collider and Rigidbody components. A GameObject with only a Collider is considered a Static Collider; it is an immovable part of the scene, such as a floor or a wall. An object with both a Collider and a Rigidbody component is a Rigidbody Collider, a dynamic entity fully simulated by the physics engine, subject to forces like gravity and momentum. A third type, the Kinematic Rigidbody Collider, possesses a Rigidbody marked as “Is Kinematic.” This object is not influenced by the physics engine’s forces but can be moved programmatically by manipulating its Transform component, making it ideal for elements like moving platforms or doors.
Finally, any Collider can be configured as a Trigger by enabling its “Is Trigger” property. Instead of simulating a physical collision (i.e., repulsion), a trigger detects when another collider enters its volume and dispatches event messages, such as OnTriggerEnter, to its scripts.
The behavior resulting from the intersection of these object types is formally defined by Unity’s Collision Interaction Matrix. This matrix is a critical debugging tool, as it explicitly dictates when physical collisions occur and when trigger messages are sent. For instance, it specifies that for a trigger event to be generated, at least one of the two interacting objects must have a Rigidbody component. Two static colliders, even if one is a trigger, will not detect each other, a common point of error for developers.
Coroutines
Standard functions within a script execute synchronously, completing their entire logic within a single frame’s update cycle. However, game logic often requires operations that span multiple frames, such as sequencing events over time or waiting for a condition to be met. To handle these asynchronous-like scenarios without blocking the main execution thread, Unity provides a mechanism known as Coroutines.
Definition
A coroutine is a special function that has the ability to pause its execution at a specific point, yield control back to the Unity engine, and then resume from that same point in a subsequent frame.
In C#, a coroutine is declared as a method with the return type IEnumerator. The pausing mechanism is facilitated by the yield return statement. The object returned by this statement acts as an instruction to Unity’s coroutine scheduler, dictating when the function should resume. Common yield instructions include new WaitForSeconds(t), which pauses for a specified duration of game time, and new WaitUntil(() => condition), which waits until a provided lambda expression evaluates to true. This functionality allows for the creation of complex, time-based behaviors in a clean and readable manner.
Yield Instruction
Behavior
yield return null
Wait one frame
yield return new WaitForSeconds(2f)
Wait for specified seconds (affected by timeScale)
yield return new WaitForSecondsRealtime(2f)
Wait for real seconds (ignores timeScale)
yield return new WaitForFixedUpdate()
Wait until next FixedUpdate
yield return new WaitForEndOfFrame()
Wait until end of frame (after rendering)
yield return new WaitUntil(() => condition)
Wait until condition is true
yield return new WaitWhile(() => condition)
Wait while condition is true
yield return StartCoroutine(OtherCoroutine())
Wait for another coroutine to finish
Pros and Cons of Using Coroutines in Unity
Pros
Cons
Suspend and resume execution easily.
Can result in unexpected or hard-to-trace behavior.
Ideal for creating time-based behaviors.
Can be more difficult to debug than standard functions.
Split long-running processes across frames.
Can become complex and difficult to manage if overused.
Can be used to run game logic in parallel (conceptually).
Timed Sequences
IEnumerator SpawnEnemyWaves(){ for (int wave = 0; wave < 5; wave++) { SpawnEnemies(wave); yield return new WaitForSeconds(10f); // Wait between waves } Debug.Log("All waves completed!");}
IEnumerator DestroyAfterDelay(GameObject obj, float delay){ yield return new WaitForSeconds(delay); Destroy(obj);}
Control and Time Scale
Coroutines are not invoked directly; their execution must be managed by the MonoBehaviour they belong to, using methods like StartCoroutine() and StopCoroutine(). This is because the MonoBehaviour instance acts as the host that processes the coroutine’s yielded instructions each frame.
Related to this temporal control is the Time.timeScale property, a static variable that globally modifies the rate at which game time elapses. A timeScale of 1.0 represents normal speed, 0.5 is half-speed, and 0.0 effectively pauses the game’s logical updates and physics simulations. It is important to note that WaitForSeconds respects Time.timeScale, meaning it will take longer to complete if the game is in slow motion. Conversely, WaitForSecondsRealtime operates on unscaled, real-world time, making it suitable for UI animations or operations that must proceed normally even when the game is paused. While powerful for creating time-based logic and spreading computationally intensive tasks across multiple frames, coroutines can introduce complexity in debugging and state management if not used judiciously.
Managing Data with Scriptable Objects
A significant challenge in game development is the management of data that is not tied to a specific scene or a particular instance of a GameObject. This includes assets such as weapon statistics, character class definitions, enemy archetypes, or dialogue trees. A naive approach of storing this data directly within MonoBehaviour components leads to inefficiency, as every instantiation of a prefab results in a separate, duplicated copy of this data in memory.
The Unity engine provides an elegant architectural solution to this problem in the form of the ScriptableObject. A ScriptableObject is fundamentally a lightweight data container that can be saved as a reusable asset within the project. Unlike MonoBehaviour classes, ScriptableObject instances are not designed to be attached to GameObjects and do not receive event-driven callbacks like Update() or Start(). Their primary function is to store shared data.
using UnityEngine;[CreateAssetMenu(fileName = "Data", menuName = "Inventory/List", order = 1)]public class MyScriptableObjectClass : ScriptableObject{ public string objectName = "New MyScriptableObject"; public bool colorIsRandom = false; public Color thisColor = Color.White; public Vector3[] spawnPoints;}
The creation of a ScriptableObject type is achieved by defining a class that inherits from UnityEngine.ScriptableObject. By applying the [CreateAssetMenu] attribute to the class definition, developers can integrate the creation of new data assets directly into the Unity editor’s Assets > Create menu. This allows designers and other non-programmers to easily generate and configure numerous data assets (e.g., “PistolStats”, “RifleStats”) from a single WeaponDataScriptableObject template, without writing any code. The utility of this approach is manifold.
Firstly, it promotes a clean separation of concerns, isolating data from the logic contained within MonoBehaviour scripts. This facilitates a data-driven design workflow.
Secondly, it significantly reduces memory overhead. A hundred “Goblin” enemy instances in a scene can all reference a single “GoblinData” ScriptableObject asset for their shared stats, avoiding the memory cost of storing 100 duplicate copies. This data, being an asset, is serialized and persists between editor sessions and is included in the final game build for runtime use.
It is critical, however, to understand a fundamental limitation regarding the runtime modification of ScriptableObject data.
While the values within a ScriptableObject can be altered at runtime, these changes are not serialized and saved back to the asset database. In a built game, such changes will be discarded when the application closes or potentially even between scene loads. Their intended use is for storing pre-configured, “design-time” data that is read-only at runtime.
For persisting runtime data, such as player progress or settings, alternative serialization methods, like writing to binary files, JSON, or using Unity’s PlayerPrefs system, must be employed.
The Object Pooling Pattern
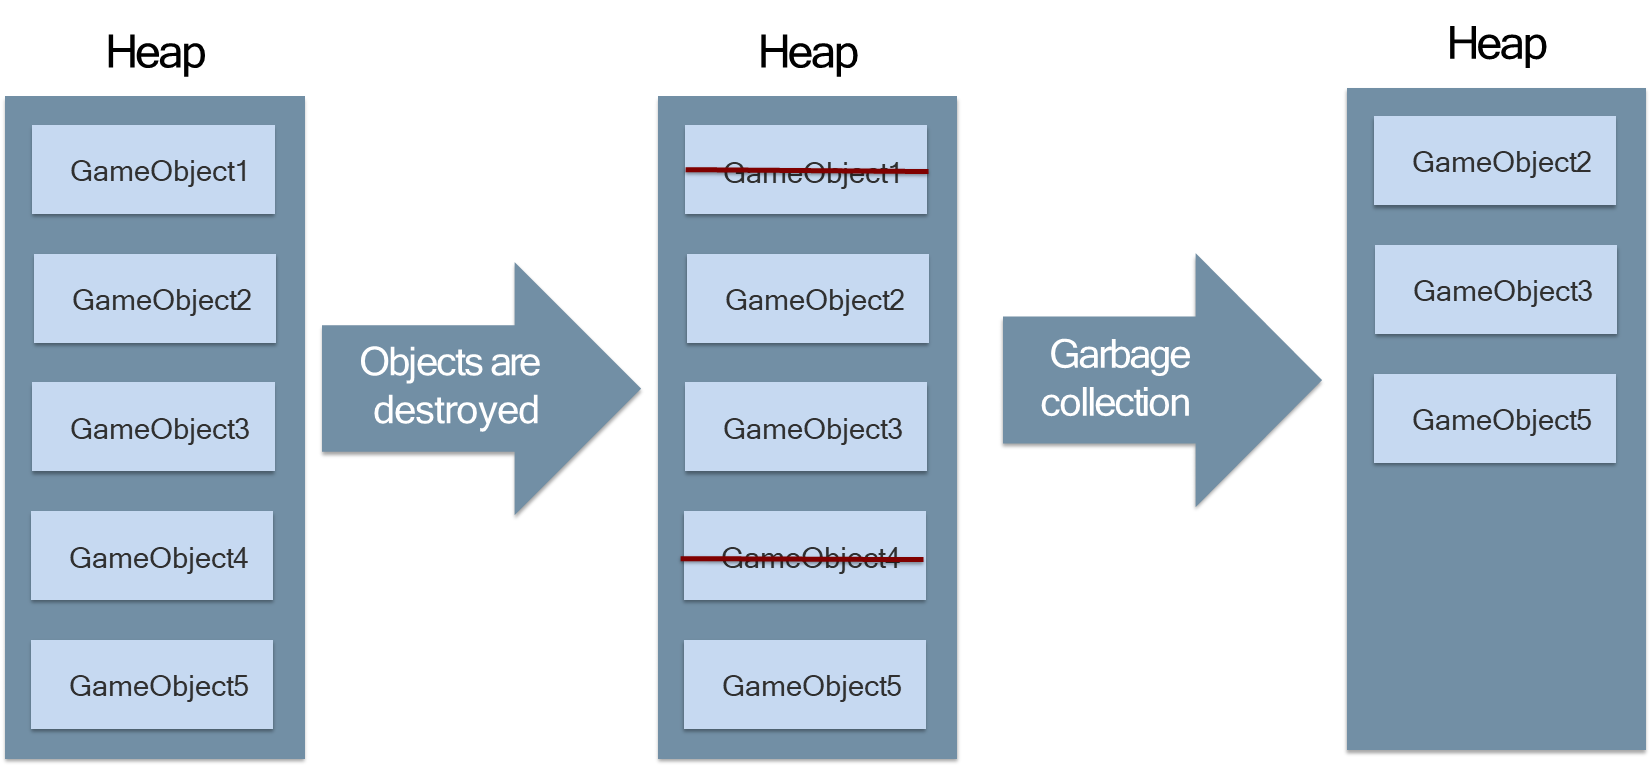
A frequent requirement in game development is the dynamic creation and destruction of GameObjects, such as projectiles, particle effects, or collectible items. The naive approach involves using the Instantiate() method to create an object and the Destroy() method to remove it. However, these operations are computationally expensive as they involve frequent memory allocation and deallocation on the system’s heap. This process leads to memory fragmentation and, more critically, triggers the Garbage Collector (GC).
Definition
The GC is a system process responsible for identifying and reclaiming blocks of memory that are no longer in use.
Marking: The GC scans the heap to identify which objects are still reachable (i.e., referenced by active code) and which are not.
Relocation: It then compacts the heap by moving live objects together, eliminating gaps left by deallocated memory, and updating all references to point to the new locations.
Compaction: This step reduces fragmentation and optimizes memory usage.
In many environments, including Unity’s implementation of the Mono runtime, the GC operates as a “stop-the-world” process. This means that when the garbage collector runs its collection cycle—which involves marking live objects and compacting the heap—it halts the execution of all user code. This interruption manifests as a perceptible stutter or hitch in gameplay, severely degrading the user experience, particularly on resource-constrained platforms.
The Pooling Solution
The Object Pooling pattern is a creational design pattern employed to mitigate these performance issues. Instead of creating and destroying objects on demand, a pool of objects is pre-instantiated at a non-critical time, such as during a level load. These objects are initially deactivated and stored in a collection.
When the game requires a new instance of an object, it requests one from the pool. The pool provides an available, inactive object from its collection, activates it, and presents it to the requesting code. When the object is no longer needed, it is not destroyed. Instead, it is “returned” to the pool, which simply deactivates it and places it back into the collection of available objects. By reusing a fixed set of objects, this pattern circumvents the cycle of continuous memory allocation and deallocation, thereby avoiding the invocation of the garbage collector and ensuring a smoother, more consistent frame rate.
The Observer Pattern
As the complexity of a game’s systems increases, a common challenge emerges: a single event often necessitates a response from multiple, logically distinct subsystems.
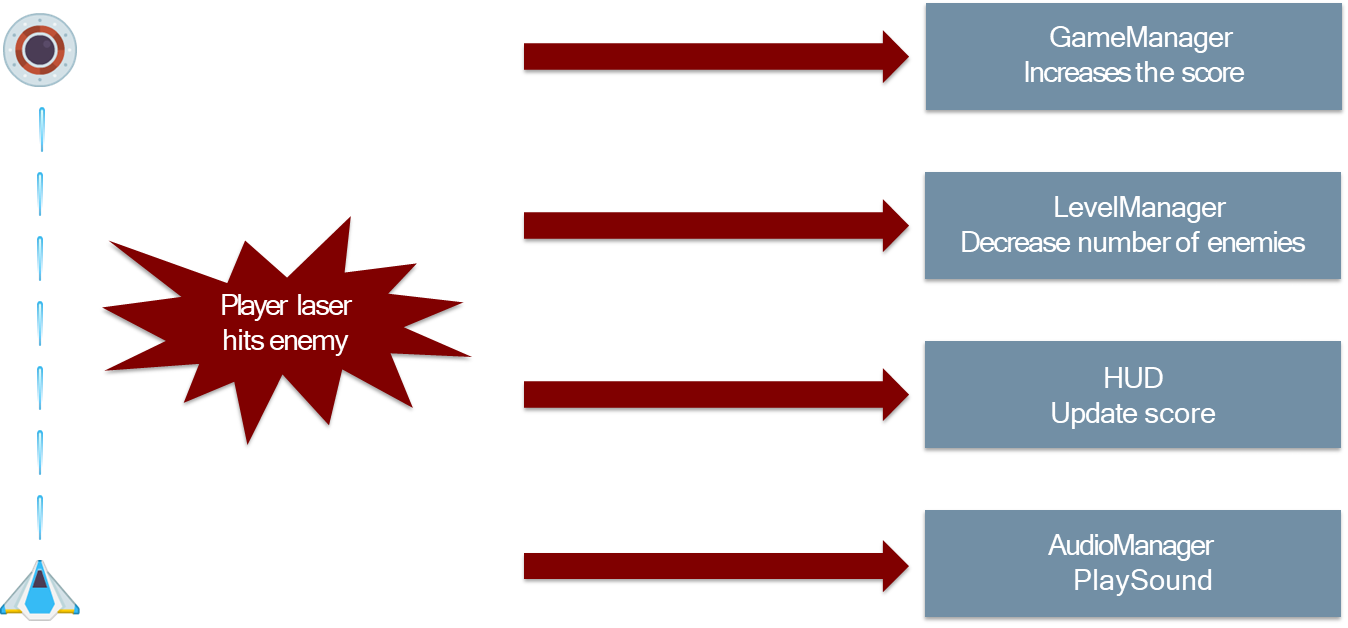
Consider the event of a player’s projectile impacting an enemy unit. This singular occurrence must trigger a cascade of updates across the game. The GameManager must register an increase in the player’s score; the LevelManager may need to decrement its count of active adversaries; the HUD (Heads-Up Display) must visually reflect the new score; and the AudioManager is required to emit an auditory cue, such as an explosion sound. A simplistic implementation would involve the Enemy script holding direct references to each of these systems and invoking their respective methods. This approach, however, results in a condition known as tight coupling, where the Enemy class becomes explicitly dependent on the concrete implementations of the GameManager, LevelManager, HUD, and AudioManager. Such an architecture is inherently brittle; the modification or removal of any one of these dependent systems, like the AudioManager, would necessitate code changes within the Enemy script itself, creating a maintenance bottleneck and hindering modularity.
The Observer Pattern offers a sophisticated architectural solution to this problem of tight coupling. This pattern establishes a one-to-many dependency between objects, where a central object, termed the Subject, maintains a collection of dependent objects, known as Observers. When the Subject undergoes a state change, it automatically notifies all its Observers, typically by invoking a specific method on each.
In our example, the Enemy acts as the Subject. It does not need explicit knowledge of the GameManager or HUD; it only maintains a list of registered Observer objects. Upon being hit, the Enemy executes a NotifyObservers() method, which iterates through its list and calls an update method, such as OnNotify(), on each Observer.
To enforce a consistent contract, all Observers can be designed to implement a common interface (e.g., IEnemyObserver), which guarantees the presence of the OnNotify() method. This design effectively inverts the dependency. The Subject is no longer dependent on the Observers; instead, the Observers are dependent on the Subject’s notification mechanism. This creates a highly decoupled system where new reactive behaviors can be introduced simply by creating a new Observer class and registering it with the Subject, requiring no modifications to the Subject’s source code.
The Publisher-Subscriber Pattern
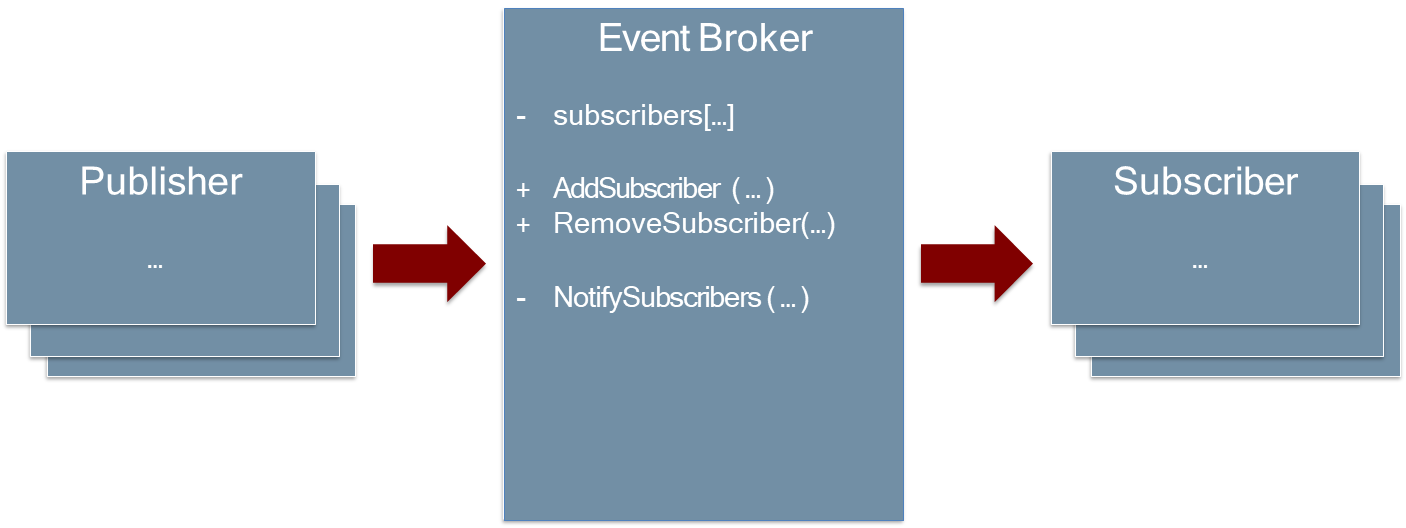
While the Observer pattern significantly reduces coupling, it still necessitates that the Observers possess a direct reference to the Subject to facilitate their initial registration. The Publisher-Subscriber Pattern extends the principle of decoupling by introducing an intermediary component, commonly referred to as an Event Broker or Event Manager. This pattern completely severs the direct link between the object that raises an event and the objects that respond to it. The Event Broker acts as a central communication hub or a message bus. Senders of messages, known as Publishers, do not send notifications directly to receivers. Instead, they publish messages to the Event Broker, typically categorized under specific topics or event types, such as “OnEnemyDefeated”. The Publisher has no knowledge of which objects, if any, are listening for this event.
Conversely, objects that need to react to these events, known as Subscribers, register their interest in specific event types with the central Event Broker. They “subscribe” to the “OnEnemyDefeated” event and provide a callback method to be executed when that event is published. When the Enemy (Publisher) is defeated, it dispatches a single message to the Event Broker. The Broker then consults its registry and forwards the message to all objects that have subscribed to that particular event type, including the HUD, GameManager, and AudioManager.
This architecture achieves a state of complete decoupling; the Publisher and Subscribers are entirely ignorant of each other’s existence, communicating only indirectly through the Event Broker. This paradigm vastly improves modularity and flexibility, as components can be added, removed, or modified within the system without causing ripple effects, so long as they adhere to the communication contract established by the Event Broker.
Building the Core Gameplay Loop
With a grasp of Unity’s fundamentals, we can now assemble the essential systems that form a complete gameplay experience. This chapter will guide you through the practical implementation of four critical components: a system for tracking the player’s score, a robust event system to manage communication between different parts of your game, the user interface that connects the player to the game world, and the object pooling pattern for high-performance gameplay.
Keeping Score: Implementing a Score System
Nearly every game needs a way to measure player success. A score system is a fundamental feature that provides feedback, creates a sense of achievement, and often forms the primary goal for the player. At its core, a score system has three main responsibilities:
Storing the Score: It needs a variable, typically an integer or a float, to hold the current score.
Modifying the Score: It must provide public methods that other parts of the game can call to increase or decrease the score.
Communicating the Score: It needs a way to let other systems, particularly the UI, know when the score has changed so it can be displayed to the player.
The Singleton Score Manager
Because the score is a global piece of data that many different game objects (enemies, collectibles, UI elements) might need to access, it is a perfect candidate for the Singleton design pattern. A Singleton is a class that guarantees only one instance of itself exists throughout the game’s lifecycle. This provides a single, easily accessible, global point of contact.
Here is a conceptual C# script for a ScoreManager:
using UnityEngine;public class ScoreManager : MonoBehaviour{ // The static instance of the ScoreManager (the core of the Singleton pattern) public static ScoreManager Instance { get; private set; } // The current score public int CurrentScore { get; private set; } // Awake is called before Start private void Awake() { // Singleton setup if (Instance != null && Instance != this) { Destroy(gameObject); // Destroy duplicate instances } else { Instance = this; // DontDestroyOnLoad(gameObject); // Optional: keeps the manager across scene loads } } // A public method to add points to the score public void AddScore(int points) { CurrentScore += points; Debug.Log("Score is now: " + CurrentScore); // Here, we will later add a call to the event system to notify the UI }}
To use this, you would create an empty GameObject in your scene called “ScoreManager” and attach this script to it. Now, any other script in the game can easily add to the score by calling:
ScoreManager.Instance.AddScore(100);
The Nervous System: The Event System
As we saw with the Observer and Publisher-Subscriber patterns, creating direct references between all your game systems leads to “spaghetti code” that is brittle and hard to manage. A centralized Event System is the architectural glue that holds a game together, allowing different systems to communicate without knowing about each other.
Think of an event system as a radio station:
Publishers are the radio hosts. They broadcast messages (events) on specific channels (e.g., “OnPlayerDied,” “OnEnemyDefeated”). They don’t know or care who is listening.
Subscribers are the listeners. They tune their radios to the channels they care about and react when they hear a broadcast. They don’t know who the host is, only that a message has arrived.
The Event System is the radio tower, broadcasting the signals.
In Unity, this is often implemented using C# events or Actions. An Action is a delegate that acts as a flexible and type-safe function pointer.
Here is a conceptual EventManager script:
using System;public static class EventManager{ // An event that broadcasts an integer (e.g., points value) when an enemy is defeated public static event Action<int> OnEnemyDefeated; // A method for publishers to call to raise the event public static void RaiseEnemyDefeated(int points) { // The ?.Invoke() is a safe way to call the event, doing nothing if there are no subscribers OnEnemyDefeated?.Invoke(points); } // Another example: an event with no parameters for when the player dies public static event Action OnPlayerDied; public static void RaisePlayerDied() { OnPlayerDied?.Invoke(); }}
Now, our other scripts can interact with this system:
An Enemy script (Publisher) would call EventManager.RaiseEnemyDefeated(100); when it dies.
Our ScoreManager (Subscriber) would “listen” for this event. It subscribes to the event in OnEnable and, crucially, unsubscribes in OnDisable to prevent memory leaks.
// Inside the ScoreManager scriptprivate void OnEnable(){ // Subscribe the AddScore method to the OnEnemyDefeated event EventManager.OnEnemyDefeated += AddScore;}private void OnDisable(){ // Unsubscribe to prevent errors and memory leaks EventManager.OnEnemyDefeated -= AddScore;}
With this in place, the ScoreManager will automatically call its AddScore method whenever any enemy in the game raises the OnEnemyDefeated event. The systems are completely decoupled.
The Player’s Window: UI, GUI, and Modern Interfaces
The User Interface (UI) is the collection of all elements that allow a player to interact with and receive information from a game. This includes everything from health bars and score displays to menus and inventory screens. The Graphical User Interface (GUI) refers specifically to the visual, graphical elements of that interface.
Unity provides a powerful built-in system, commonly referred to as Unity UI, for creating interfaces. The key components are:
The Canvas: This is the root component for all UI elements. It controls how the UI is rendered. The three main render modes are:
Screen Space - Overlay: This is the default. The UI is drawn on top of everything else in the scene, making it perfect for score displays, health bars, and pause menus.
Screen Space - Camera: The UI is rendered a fixed distance in front of a specific camera. This is useful if you want the UI to be affected by the camera’s post-processing effects.
World Space: The UI exists as an object in the 3D world. It can be behind or in front of other objects. This is ideal for interactive panels on a computer screen within the game or floating health bars above an enemy’s head.
Rect Transform: Instead of a standard Transform, all UI elements have a Rect Transform. This component includes tools for anchoring and pivoting, which are essential for creating a responsive UI that scales and adapts correctly to different screen sizes and aspect ratios.
UI Components: Unity provides a rich set of components you can use to build your interface, including:
Text / TextMesh Pro: For displaying text. TextMesh Pro is the modern, recommended asset for its superior quality and flexibility.
Image: For displaying sprites and textures, used for icons, backgrounds, and health bars.
Button: A clickable element that can trigger functions in your scripts.
Slider: A draggable bar, perfect for volume controls or health bars.
Panel: A simple image container, often used as a background for menus.
To make a UI element, like a score display, functional, you create a public reference to it in a manager script and then update its properties from code.
// Inside a UIManager scriptusing TMPro; // Need this namespace for TextMesh Prousing UnityEngine;public class UIManager : MonoBehaviour{ public TextMeshProUGUI scoreText; // This method would be subscribed to an event from the ScoreManager public void UpdateScoreDisplay(int newScore) { scoreText.text = "Score: " + newScore; }}
The Soundscape: Music and Sound Management
Beyond visuals and mechanics, a game’s audio is what breathes life into its world. The subtle hum of a spaceship, the triumphant fanfare of a level completion, and the impactful thud of a landing all contribute to the player’s emotional journey. A well-designed sound system is not just background noise; it’s a core component of feedback, atmosphere, and immersion. This chapter covers the fundamental components of audio in Unity and how to build a centralized AudioManager to control your game’s soundscape.
Unity’s audio system is built on three fundamental components that work together like a real-world sound system:
AudioClip: This is the actual audio file you import into your Unity project (e.g., an .mp3, .wav, or .ogg file). It is the raw data of a sound. Think of this as the MP3 file on your computer or the record you want to play.
AudioSource: This is a component you attach to a GameObject in your scene. It acts as the “speaker” that plays an AudioClip. You can have many AudioSource components in a scene. Each source has properties like:
Clip: The AudioClip it will play.
Volume: How loud the sound is (0 to 1).
Pitch: The speed (and therefore pitch) of the playback.
Loop: Whether the clip should repeat automatically.
Play on Awake: Whether the sound should play as soon as the object is activated.
Spatial Blend: A slider that controls whether the sound is 2D (heard equally everywhere, like background music) or 3D (emanating from its position in the game world).
AudioListener: This is the “microphone” of the scene. It receives input from all active AudioSource components and plays the sound through the player’s speakers. There should only be one AudioListener in a scene. By default, it is attached to the Main Camera, which is usually the correct placement as it represents the player’s “ears.”
In summary: An AudioSource on a GameObject plays an AudioClip, and the AudioListener on the camera “hears” it.
Music vs. Sound Effects (SFX)
Functionally, music and sound effects are both just AudioClips. However, in game design, they serve very different purposes, and we should manage them differently:
Background Music (BGM):
Purpose: Sets the mood, theme, and emotional tone of a scene or level.
Characteristics: Typically long, looping, and non-diegetic (the characters in the game world don’t hear it).
Implementation: Usually handled by a single, dedicated AudioSource with a 2D Spatial Blend and the Loop property enabled. This source often resides on a manager object that persists across the entire game.
Sound Effects (SFX):
Purpose: Provides direct feedback for player actions and game events.
Characteristics: Typically short, non-looping, and event-driven (a button click, a footstep, an explosion). They can be 2D (for UI clicks) or 3D (for an explosion’s location).
Implementation: Triggered from code in response to specific events. A common mistake is to use AudioSource.Play() for rapid SFX, which will cut off the previous sound. The best practice is to use AudioSource.PlayOneShot(clip), which plays a sound once without interrupting any other clips playing on that same source.
Building a Central AudioManager
To avoid having every script manage its own audio, we create a centralized AudioManager. Like the ScoreManager, this is a perfect candidate for a Singleton pattern, providing a global access point for playing any sound from anywhere in your code.
Here is a conceptual AudioManager script:
using UnityEngine;public class AudioManager : MonoBehaviour{ // Singleton instance public static AudioManager Instance { get; private set; } // AudioSource components for music and SFX [SerializeField] private AudioSource musicSource; [SerializeField] private AudioSource sfxSource; private void Awake() { // Singleton setup if (Instance != null && Instance != this) { Destroy(gameObject); } else { Instance = this; // DontDestroyOnLoad(gameObject); // Make it persist across scenes } } // Public method to play a music track public void PlayMusic(AudioClip musicClip) { musicSource.clip = musicClip; musicSource.Play(); } // Public method to play a sound effect public void PlaySFX(AudioClip sfxClip) { // Use PlayOneShot for SFX to allow multiple sounds to overlap sfxSource.PlayOneShot(sfxClip); }}
To use this:
Create an empty GameObject named “AudioManager”.
Attach this script to it.
Add two AudioSource components to the “AudioManager” GameObject.
Drag one AudioSource into the musicSource field and the other into the sfxSource field in the Inspector. Configure the music source to loop and have a 2D spatial blend.
Now, any script can play a sound effect by calling: AudioManager.Instance.PlaySFX(mySoundClip);
Advanced Control with the Audio Mixer
For professional-level audio control, Unity provides the Audio Mixer. The Mixer is a powerful tool that allows you to route audio from your sources, apply effects, and control volume levels in complex ways.
Key concepts include:
Groups: The Mixer is organized into groups, which function like channels on a real-life mixing board. A common setup is to create groups for “Master”, “Music”, and “SFX”. You can then route the output of your AudioSource components to these specific groups.
Effects: You can add effects like reverb, echo, and equalization to any group, affecting all sounds that pass through it.
Snapshots: These are saved “states” of the entire Mixer. You can use them to instantly change the audio landscape—for example, creating a “Paused” snapshot that lowers the volume and applies a low-pass filter to muffle the sound.
Exposed Parameters: This is the most critical feature for user-facing controls. You can “expose” any parameter in the Mixer (like the volume of the “SFX” group) to your scripts. This allows you to connect a UI slider directly to the Mixer’s volume, easily creating in-game volume controls for the player.
By using an AudioManager for organization and an Audio Mixer for control, you can build a robust, scalable, and professional audio system for any game.