Consider a scenario where you need to manage a hierarchy of products, each with its own weight, and ensure that the total weight of a product reflects the cumulative weight of all its sub-products. This is a common requirement in inventory management systems, where products can have multiple variants or components. The Product table schema is defined as follows:
where:
ID: A unique identifier for each product.
SuperProduct: Refers to the ID of the product’s parent or “super-product.” A root product, with no parent, has SuperProduct set to NULL.
OwnWeight: Represents the product’s intrinsic weight.
TotalWeight: Reflects the cumulative weight, incorporating the OwnWeight and the weights of all its sub-products.
The goal is to maintain consistency in the TotalWeight field as users perform operations like adding, deleting, or reassigning products.
In this hierarchy, maintaining the TotalWeight ensures that each product reflects its cumulative weight accurately, facilitating operations on hierarchical data.
Trigger Definitions and Functions
Users can perform the following operations on the Product table, each of which affects the hierarchical weight calculation:
graph LR
    T1((T1)) --> T3((T3)) --> T3
    T2((T2)) --> T3
    T4((T4)) --> T3
Trigger 1: insertion of a new product (user event) by setting the total weight of it.
Trigger 2: deletion of a product (user event) by subtracting the product’s weight from its super-product (we need to ensure that SuperProduct is not NULL).
Trigger 3: update of an existing product’s weight (trigger event) by updating the TotalWeight of the super-product.
Trigger 4: update of a product’s super-product (user event) by decreasing the total weight of the previous super-product and increasing the total weight of the new super-product if not null. We need to ensure that SuperProduct is different from the previous super-product.
Trigger 1: Set Total Weight After Product Insertion
The first trigger, product_AFTER_INSERT, sets the initial TotalWeight of a new product to match its OwnWeight. This trigger is invoked after a product is inserted, ensuring that products start with a TotalWeight that reflects only their own weight, as they do not yet have sub-products.
CREATE TRIGGER product_AFTER_INSERTAFTER INSERT ON ProductFOR EACH ROWBEGIN UPDATE Product SET TotalWeight = OwnWeight WHERE ID = NEW.ID;END;
This mechanism initializes the TotalWeight correctly, setting the stage for further updates if the product later becomes a super-product with nested sub-products.
Trigger 2: Adjust Total Weight After Product Deletion
The second trigger, product_AFTER_DELETE, decreases the TotalWeight of a super-product when a sub-product is deleted. This trigger fires after a delete operation and applies only if the deleted product has a super-product (SuperProduct is not NULL).
CREATE TRIGGER product_AFTER_DELETEAFTER DELETE ON ProductFOR EACH ROWWHEN OLD.SuperProduct IS NOT NULLBEGIN UPDATE Product SET TotalWeight = TotalWeight - OLD.TotalWeight WHERE ID = OLD.SuperProduct;END;
Here, the TotalWeight of the super-product is reduced by the TotalWeight of the deleted sub-product, preserving the accurate cumulative weight in the hierarchy.
Trigger 3: Propagate Weight Changes to Super-Products
The product_AFTER_UPDATE_TOTALWEIGHT trigger is designed to handle updates to the TotalWeight of a product and propagate these changes up the hierarchy to its super-product. This trigger only fires if the TotalWeight changes and the product has a super-product.
CREATE TRIGGER product_AFTER_UPDATE_TOTALWEIGHTAFTER UPDATE OF TotalWeight ON ProductFOR EACH ROWWHEN NEW.SuperProduct IS NOT NULL AND NEW.TotalWeight != OLD.TotalWeight -- remember the 3-valued logicBEGIN UPDATE Product SET TotalWeight = TotalWeight + (NEW.TotalWeight - OLD.TotalWeight) WHERE ID = NEW.SuperProduct;END;
This ensures that any change in a product’s TotalWeight (such as when a sub-product is added or removed) is accurately reflected in the TotalWeight of its super-product, allowing the hierarchy to maintain integrity.
Trigger 4: Adjust Weights After Changing Super-Product
Finally, product_AFTER_UPDATE_SUPER manages changes in the SuperProduct field itself. When the parent of a product changes, this trigger updates the weights of both the old and new super-products to reflect the reassignment.
CREATE TRIGGER product_AFTER_UPDATE_SUPERAFTER UPDATE OF SuperProduct ON ProductFOR EACH ROWWHEN NEW.SuperProduct IS NULL OR NEW.SuperProduct != OLD.SuperProductBEGIN UPDATE Product SET TotalWeight = TotalWeight - OLD.TotalWeight WHERE ID = OLD.SuperProduct; UPDATE Product SET TotalWeight = TotalWeight + NEW.TotalWeight WHERE ID = NEW.SuperProduct;END;
This trigger decreases the TotalWeight of the old super-product by the moved product’s TotalWeight and adds this weight to the new super-product, thus preserving the cumulative weights across the hierarchy.
Additional Considerations
Deletion of Sub-Products: The deletion of sub-products related to a deleted product is managed by referential integrity using ON DELETE CASCADE. This ensures that when a product is deleted, all its sub-products are automatically removed from the database.
Cascading Updates: The triggers are designed to ensure that any changes in product hierarchy or weights are propagated throughout the hierarchy, maintaining accurate total weights for all products.
Cascading Triggers
Cascading triggers can lead to complex and potentially problematic scenarios when multiple triggers respond to the same event. When multiple triggers are activated by the same event, the DBMS implements a precedence criterion to determine the order of execution. Different database vendors may have different policies regarding this precedence. Commonly, triggers that are delayed will be executed later, but the specifics can vary, making it challenging to predict the overall effect when multiple triggers interact.
Postgres example
Consider a simple table ttest with just one attribute x. Two triggers are defined:
: halves x when x >= 10
CREATE TRIGGER T1 AFTER UPDATE OF x ON ttestFOR EACH ROW WHEN (NEW.x >= 10)UPDATE ttest SET X = new.x / 2.0;
: increases x by 40% when x >= 6
CREATE TRIGGER T2 AFTER UPDATE OF x ON ttestFOR EACH ROW WHEN (NEW.x >= 6)UPDATE ttest SET X = new.x * 1.4;
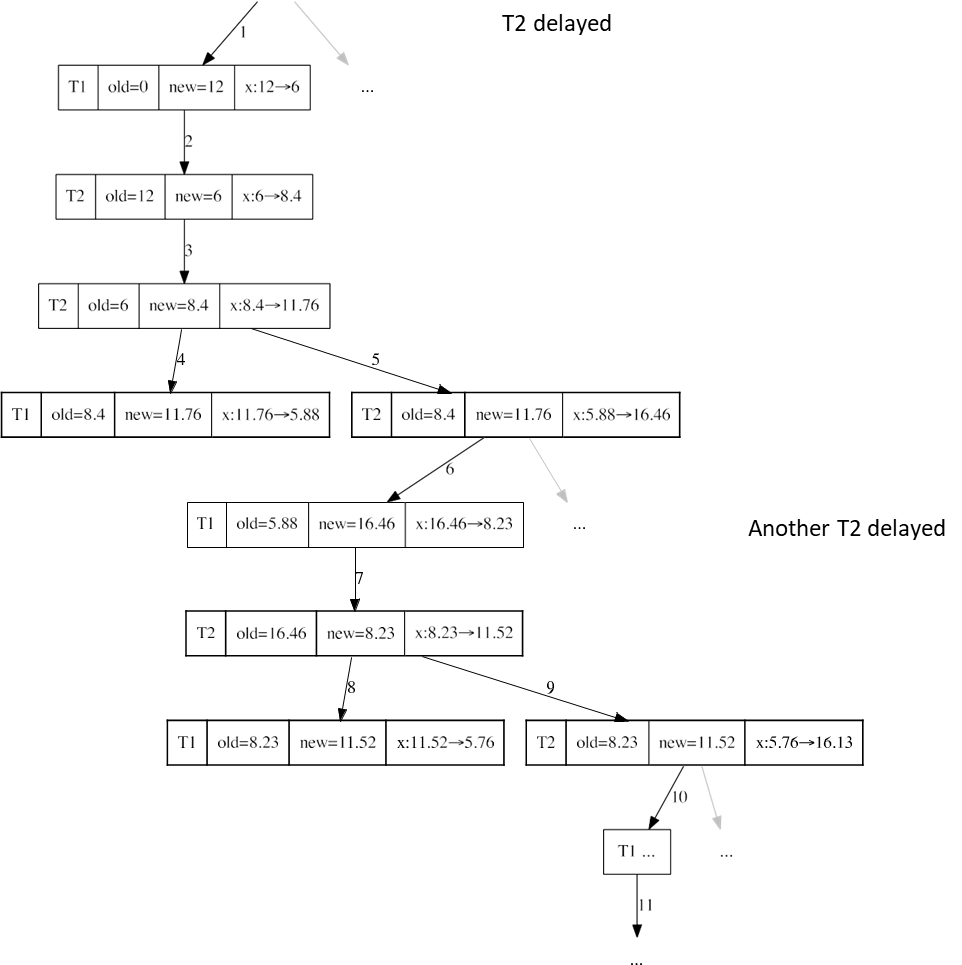
If we update x to the value 12, the following sequence of events occurs:
First, we update x to 12, which activates both triggers. takes precedence and halves the value of x. The execution of is delayed. The initial value of x was 0, and the update changed it to 12, so halves its value.
The change made by activates another instance of , which increases x by 40%, from 6 to 8.4.
Another instance of is executed, changing x from 8.4 to 11.76.
Now both and are activated, but takes precedence, halving the value of x, and is delayed. The process continues by executing the delayed instances of .
The current value of x is 5.88, but the “new” value that this instance of sees is still 11.76. Indeed, it is executed after step 4 but was activated after step 3. This execution changes x from 5.88 to 16.46.
The process continues indefinitely, and when the value of x becomes less than 6, we branch to execute a delayed instance of . The process never stops, and the system will eventually report an error.
Older, delayed instances of will never be executed.
As a consequence of this cascading execution, several issues can arise:
Infinite Loop: The cascading execution of triggers can lead to an infinite loop where x oscillates between values. The system may eventually raise an error due to exceeding resource limits or other constraints.
Delayed Instances: Instances of triggers that are delayed can remain pending without execution, potentially leading to inconsistencies or unpredictable behavior if not managed properly.
Recommendations
Careful Design: When implementing triggers, ensure that their conditions do not lead to circular dependencies or infinite loops.
Testing: Rigorously test trigger interactions in various scenarios to identify potential issues before deploying changes to production systems.
Limit Trigger Scope: Where possible, limit the scope and impact of triggers to minimize the risk of cascading effects. This can include using WHEN clauses that reduce the likelihood of triggering multiple actions unnecessarily.
Use of Flags: Implement flags or additional state variables to control trigger execution and prevent repeated activations in response to cascading changes.