In the realm of Database Management Systems (DBMS), triggers play a critical role by acting as automated responses to specific changes in the database, such as the insertion, updating, or deletion of records within a designated table. Triggers represent a significant evolution in the management of databases, transitioning from a “passive” approach, where the database merely responds to queries, to a more “active” paradigm. This shift enables databases to maintain integrity and enforce business rules automatically, thereby enhancing data quality and consistency without requiring additional user intervention.
The concept of integrity constraints first gained traction in the mid-1970s, with an emphasis on ensuring the accuracy and reliability of data stored within databases. These constraints serve to prevent the entry of invalid data, ensuring that the information remains coherent and trustworthy. The period from the mid-1980s to the 1990s witnessed extensive research focused on the development and implementation of various constraints and triggers, leading to more sophisticated data management techniques.
The SQL-92 standard marked a significant milestone by introducing a variety of constraints such as key constraints, which ensure the uniqueness of records, referential integrity constraints that maintain valid relationships between tables, and domain constraints that define permissible values for certain attributes. These constraints were specified in a declarative manner, allowing database designers to define rules without detailing the procedural logic behind them.
As the field advanced, the SQL-99 standard emerged, further expanding the capabilities of SQL by incorporating triggers and active rules into its framework. This inclusion was accompanied by a procedural specification, which allowed for greater flexibility and complexity in defining how triggers should behave in response to data modifications.
Support for triggers can vary significantly across different database management systems. Each system may implement its own execution semantics, affecting how triggers are executed and their performance characteristics.
The Trigger Concept
At the core of the trigger concept lies the Event-Condition-Action (ECA) paradigm, which governs how triggers function within a DBMS. This paradigm operates on a straightforward principle:
whenever an event occurs, if a specified condition is met, a corresponding action is executed automatically.
Triggers thus serve as a vital mechanism for maintaining data integrity and enforcing business rules in real-time as changes occur in the database.
Triggers complement traditional integrity constraints by allowing for the evaluation of more complex conditions beyond basic checks. Once defined, triggers are compiled and stored within the DBMS in a manner akin to stored procedures. However, a key distinction lies in their execution:
stored procedures require explicit invocation by the client (e.g. through a CALL <ProcedureName> statement), while
triggers are automatically activated based on the occurrence of predefined events.
This automatic execution provides an efficient means of responding to changes in the data without requiring additional intervention from users or applications.
The process can be broken down into 3 components:
Definition
Event: The specific modification that triggers the action.
Condition: The criteria that determine whether the trigger should activate.
Action: The operation that is executed when the condition is satisfied.
Example
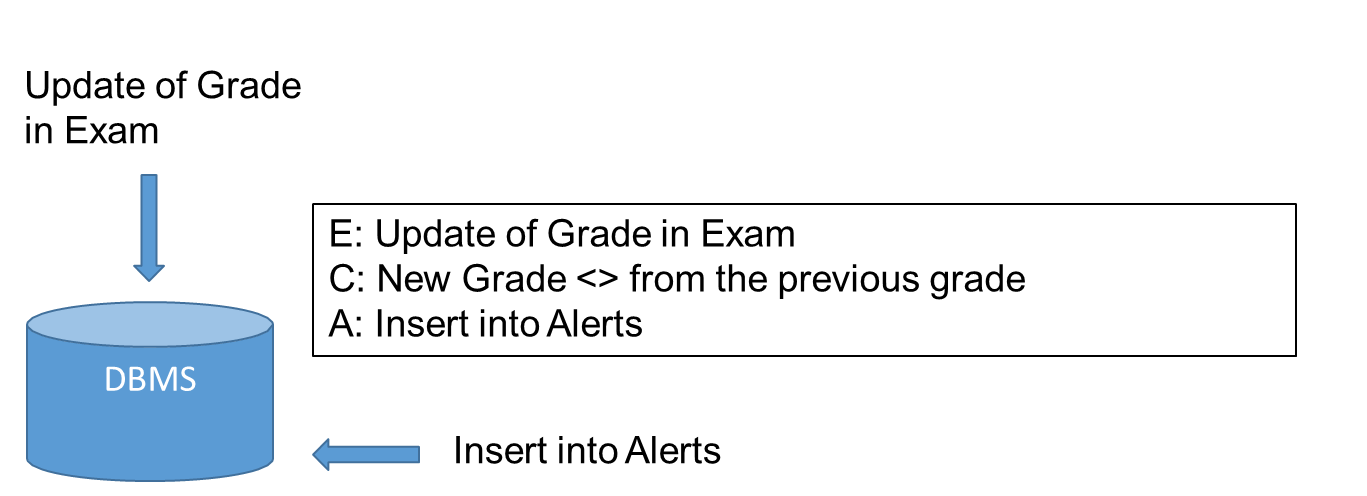
To illustrate the functionality of triggers, consider the following example involving three tables: Student, Exam, and Alerts.
The Student table contains essential information about students, including identifiers, names, and contact details.
The Exam table captures information related to students’ examination results, including their grades.
The Alerts table is designed to log alerts triggered by updates to student grades.
The structure of these tables can be defined as follows:
In this scenario, we want to generate an alert whenever a student’s grade is updated in theExamtable.
This logic can be expressed through an SQL statement for updating a student’s grade, as shown below:
UPDATE Exam SET Grade = "30"WHERE StudID = "12345" OR StudID = "54321" AND CourseID = "35";
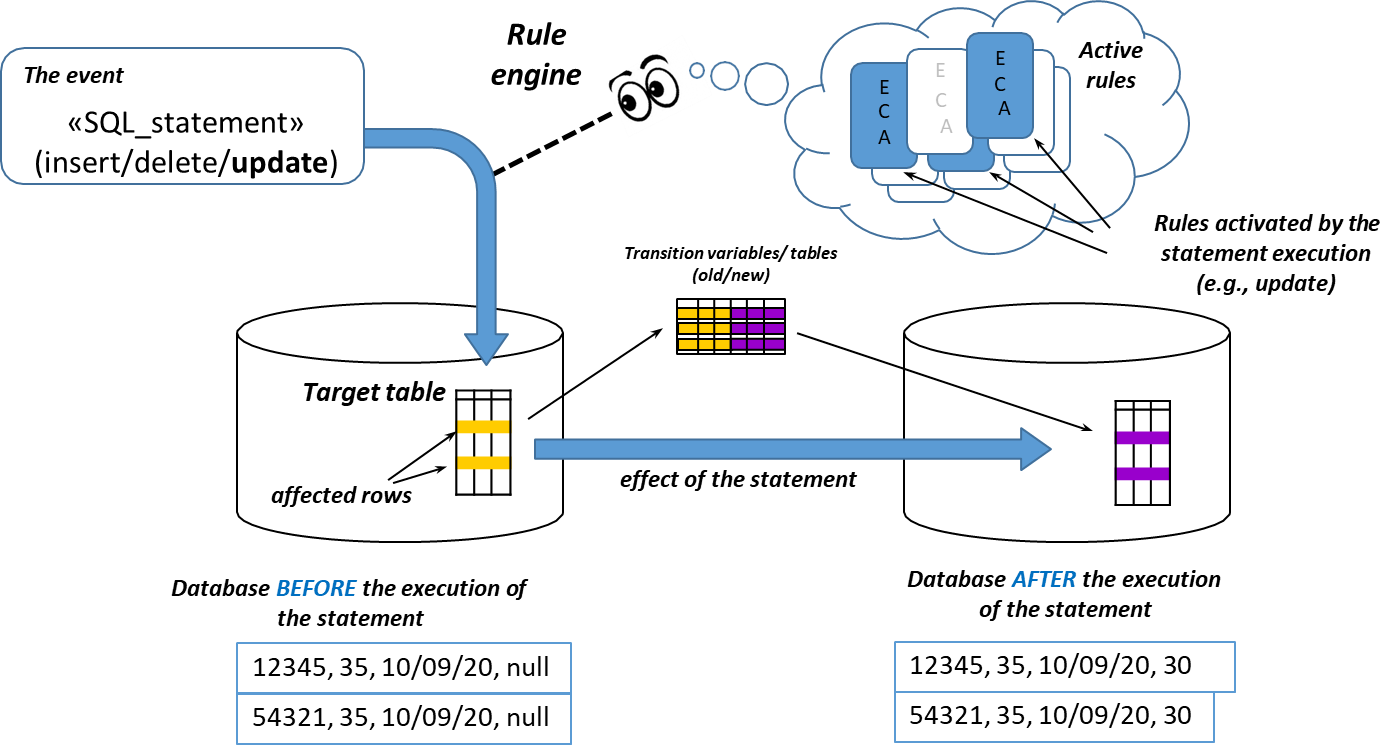
In the SQL:1999 standard, the syntax for defining a trigger is structured as follows:
CREATE TRIGGER <TriggerName>{ before | after }{ insert | delete | update [of <Column>] } on <Table> referencing { [old table [as] <OldTableAlias>] [new table [as] <NewTableAlias>] | [old [row] [as] <OldTupleName>] [new [row] [as] <NewTupleName>] }[ for each { row | statement } ][ when <Condition> ]<SQLProceduralStatement>
The event can be an insert, delete, or update, indicating what action will activate the trigger. The condition is specified through the when clause, allowing for the inclusion of complex logic to ascertain when the trigger should be executed. Finally, the action is articulated through the SQLProceduralStatement, which can encompass a range of SQL operations such as further updates or notifications.
Execution Modes of Triggers (before and after)
Triggers within a database management system can be executed in different modes, specifically Before and After, each serving distinct purposes and operational contexts.
In the Before execution mode, the actions defined in the trigger are executed prior to any modification of the database, contingent upon the specified condition being satisfied. This mode is particularly beneficial for validating proposed changes before they are committed to the database. For instance, it can be used to enforce business rules or to check data integrity before modifications occur. While Before triggers cannot directly update the database, they can manipulate transition variables that hold the values of the data being modified at a row level. This capability allows developers to influence the outcome of the transaction, ensuring that only valid changes are applied based on the predefined conditions.
Conversely, the After execution mode activates the trigger once the modification has been made to the database, assuming that the condition for triggering is met. This mode is widely utilized across various applications as it allows for actions to occur after the primary data change, such as logging actions, sending notifications, or cascading updates to related records. The After mode ensures that any operations reliant on the modified data can proceed with the assurance that the necessary changes have already been enacted.
The Role of BEFORE Triggers in the context of Update operations
In database management systems, BEFORE triggers serve a critical function in maintaining data integrity during update operations. Specifically, they can be employed to prevent undesirable values from being written to the database, such as negative numbers in a numeric field.
For instance, consider a situation where we want to ensure that values in a column do not fall below zero. In this case, we can utilize a BEFORE trigger to intercept the update operation and modify the new value accordingly.
Example of a BEFORE Trigger
Let’s say we have a table named , and we want to update the VALUE column of a specific record identified by its ID. If an attempt is made to set this value to a negative number, the trigger will adjust it to zero instead.
The SQL code for this trigger would look as follows:
CREATE TRIGGER NO_NEGATIVE_VALUESBEFORE UPDATE OF VALUE ON T1FOR EACH ROWWHEN (new.VALUE < 0)SET new.VALUE = 0; -- This "modifies the modification"
In this scenario, if an update statement like the following is executed:
UPDATE T1 SET T1.VALUE = -8 WHERE T1.ID = 5;
The BEFORE trigger will activate and automatically change the value being set to zero, ensuring that no negative values are stored in the database.
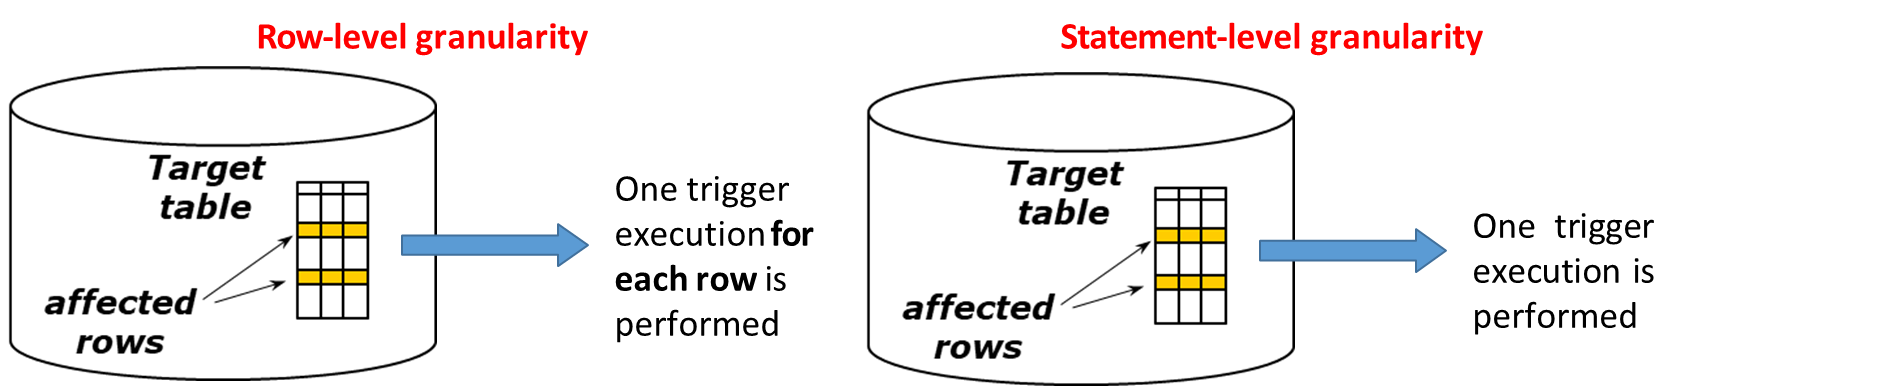
Granularity of Events
The granularity of event handling in triggers is another critical aspect, distinguishing how often and under what circumstances triggers are executed. Two primary levels of granularity exist: Row-level granularity and Statement-level granularity.
Row-level granularity dictates that the trigger is invoked once for each individual tuple affected by the triggering action. This allows for a highly specific response to each row’s change, facilitating detailed data validation and handling. While crafting row-level triggers may be conceptually straightforward, they can lead to performance inefficiencies, especially when processing large datasets, as the trigger must engage with each modified row separately.
Statement-level granularity processes the trigger only once per triggering statement, regardless of how many tuples are impacted. This approach is aligned with traditional SQL operations, which typically operate on sets of data rather than individual rows. It allows for a more efficient execution path when dealing with bulk updates, as the trigger logic is executed in a single instance for the entire statement. However, it may lack the detailed granularity that row-level triggers offer, potentially making it less suitable for scenarios that require specific row-level actions or validations.
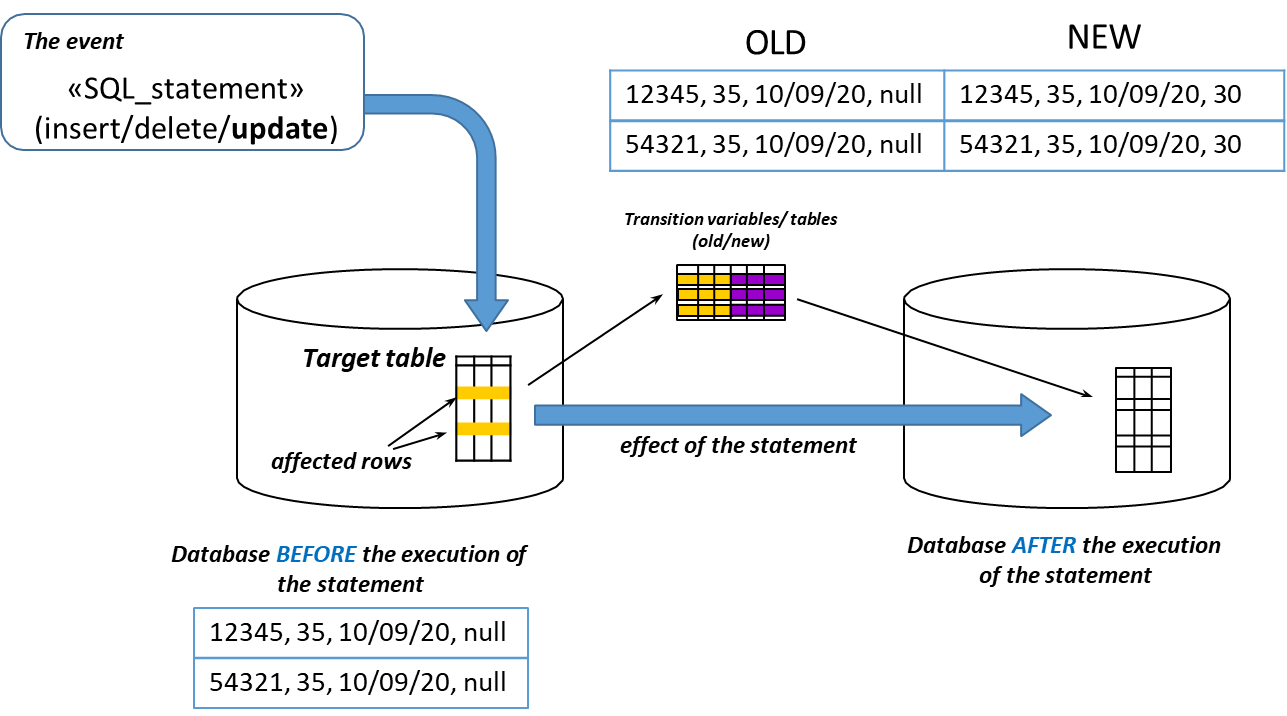
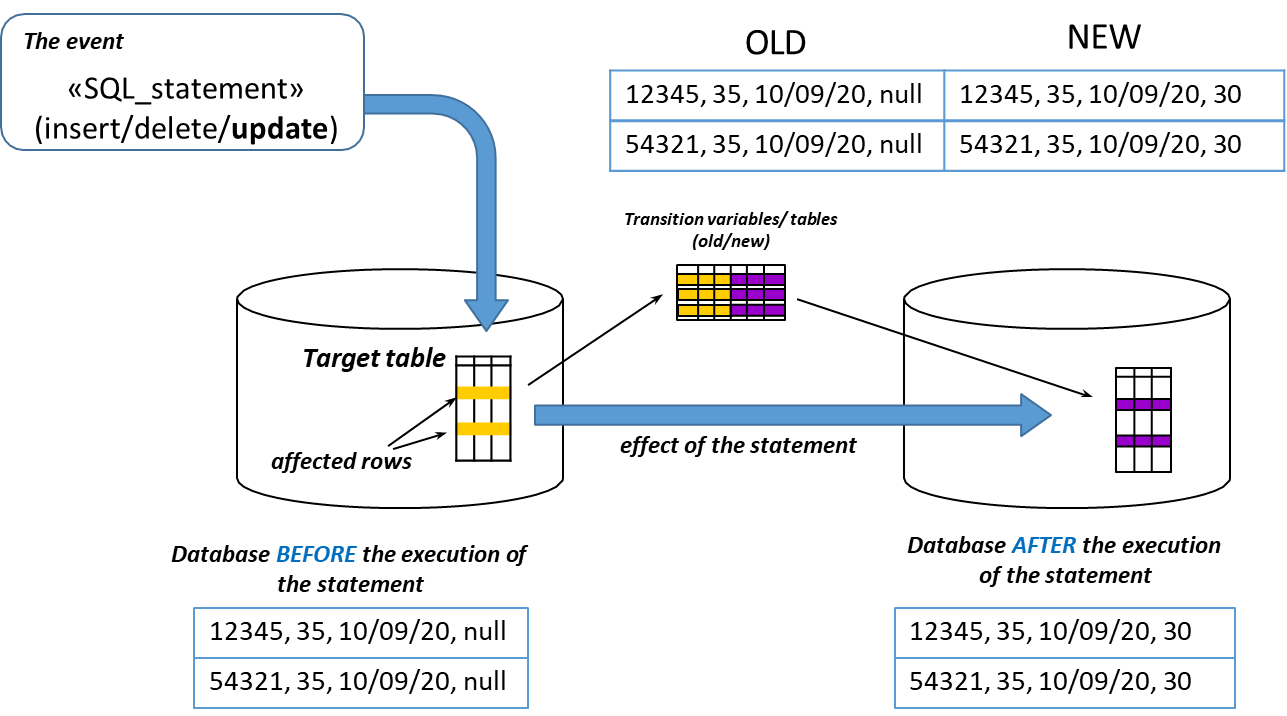
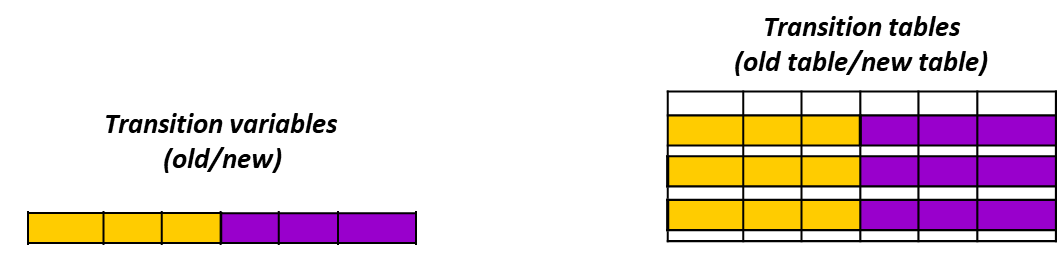
Transition Variables and Transition Tables
Transition variables serve as essential components within triggers, representing the state of data before and after modifications occur. The syntax and type of transition variables utilized depend on the granularity of the trigger.
In row-level triggers, tuple variables named old.<attributeName> and new.<attributeName> are employed to reflect the values before and after the row modification, respectively. This allows for a clear comparison and facilitates complex logic based on the specific data changes occurring in each row.
Conversely, in statement-level triggers, table variables such as old table and new table are used. These variables encompass the old and new values of all affected rows collectively, enabling a broader scope of action based on the overall state of the data.
Attention
The old and old table variables are undefined in triggers triggered by an insert event, while new and new table variables are not defined in triggers activated by delete events.
Example: Data Replication
In this example, we explore how data replication between two tables, and , can be effectively managed using database triggers. Table serves as a replica of Table , ensuring that any updates made to are mirrored in . The replication process is facilitated by defining specific triggers for various data manipulation operations, such as insertion, deletion, and updates.
Trigger for Insertion
The first scenario involves the insertion of new tuples into Table . When a new record is added, the corresponding record should also be created in Table . For instance, if we insert a new tuple with the values (ID=3, Value=20) into , the following trigger can be employed to replicate this action in :
CREATE TRIGGER REPLIC_INSAFTER INSERT ON T1FOR EACH ROWINSERT INTO T2 VALUES (new.ID, new.Value);
After executing this trigger, the tables would appear as follows:
Table
Table
ID
Value
ID
Value
1
10
1
10
2
15
2
15
3
20
3
20
This trigger executes after the insertion of a new row, copying the values from the newly inserted record in to .
Trigger for Deletion
In the second scenario, we need to ensure that if a tuple is deleted from , the same tuple is also removed from . For example, if we delete the tuple with ID=2 from , the corresponding entry must be deleted from . This can be achieved with the following trigger:
CREATE TRIGGER REPLIC_DELAFTER DELETE ON T1FOR EACH ROWDELETE FROM T2 WHERE T2.ID = old.ID;
Once this trigger is executed, the tables would look like this:
Table
Table
ID
Value
ID
Value
1
10
1
10
2
15
2
15
3
20
3
20
This trigger ensures that any deletion in results in a corresponding deletion in , maintaining consistency between the two tables.
Trigger for Update
The third scenario concerns updating the value of an existing tuple in . When the value of a tuple is modified, this change should also be reflected in . For example, if we change the value of the tuple with ID=1 from 10 to 5 in , the following trigger can be defined:
CREATE TRIGGER REPLIC_UPDAFTER UPDATE OF Value ON T1WHEN new.ID = old.IDFOR EACH ROWUPDATE T2 SET T2.Value = new.Value WHERE T2.ID = new.ID;
Table
Table
ID
Value
ID
Value
1
105
1
105
2
15
2
15
3
20
3
20
It’s important to note that this trigger only fires for updates where the ID remains unchanged. If the ID were to change, a more comprehensive implementation would be required to handle that scenario. Nevertheless, this trigger efficiently propagates changes in the value attribute from to .
Conditional Replication
The next scenario introduces conditional replication, where Table only contains records from Table whose values are “greater than or equal to 10”. This selective replication involves defining triggers that account for all events affecting the replica while enforcing the specified condition.
Table
Table
ID
Value
ID
Value
1
10
2
15
2
15
3
20
3
20
Insertion Operation
For insertion operations, we can define the following trigger to ensure that only tuples meeting the specified criteria are replicated in :
CREATE TRIGGER CON_REPL_INS -- New relevant tuple, replicateAFTER INSERT ON T1FOR EACH ROWWHEN (new.VALUE >= 10) -- This condition is evaluated during the insertion processINSERT INTO T2 VALUES (new.ID, new.VALUE);
This trigger evaluates the condition during the insertion process and only replicates tuples that satisfy the requirement.
Deletion Operation
For deletions, the corresponding trigger ensures that when a tuple with a value greater than or equal to 10 is removed from , the same action occurs in :
CREATE TRIGGER CON_REPL_DEL -- Propagate deletionAFTER DELETE ON T1FOR EACH ROWWHEN (old.VALUE >= 10)DELETE FROM T2 WHERE T2.ID = old.ID;
This trigger effectively maintains consistency between and , ensuring that irrelevant tuples are removed from the replica.
Modification Operation
When modifying values in , multiple triggers may be necessary to handle different cases based on the value of the tuples before and after the update.
New Relevant Tuple: If a previously irrelevant tuple becomes relevant due to an update, we can define a trigger as follows:
CREATE TRIGGER Cond_REPL_UPD_1 -- New relevant tuple, replicateAFTER UPDATE OF VALUE ON T1WHEN new.ID = old.IDFOR EACH ROWWHEN (old.VALUE < 10 AND new.VALUE >= 10 AND new.ID = old.ID)INSERT INTO T2 VALUES (new.ID, new.VALUE);
Already Replicated Tuple Changed: If a tuple that is already replicated is modified but remains relevant, another trigger is required to update its value in :
CREATE TRIGGER Cond_REPL_UPD_2 -- Already replicated tuple changed, propagateAFTER UPDATE OF VALUE ON T1 WHEN new.ID = old.IDFOR EACH ROWWHEN (old.VALUE >= 10 AND new.VALUE >= 10 AND old.VALUE != new.VALUE AND new.ID = old.ID)UPDATE T2 SET T2.VALUE = new.VALUE WHERE T2.ID = new.ID;
Replicated Tuple No Longer Relevant: Lastly, if a tuple that was previously relevant falls below the threshold after an update, we need a trigger to delete it from :
CREATE TRIGGER Cond_REPL_UPD_3 -- Replicated tuple no longer relevant: deleteAFTER UPDATE OF VALUE ON T1WHEN new.ID = old.IDFOR EACH ROWWHEN (old.VALUE >= 10 AND new.VALUE < 10 AND new.ID = old.ID)DELETE FROM T2 WHERE T2.ID = new.ID;
Row-Level vs. Statement-Level Triggers
In the context of triggers within a DBMS, understanding the distinction between row-level and statement-level triggers is crucial. Both types of triggers are designed to respond to changes in the database, but they operate differently, particularly in how they handle multiple affected rows during various events such as DELETE, INSERT, and UPDATE.
DELETE Event with Statement-Level Triggers
Consider a scenario where we want to delete records from a table based on a certain condition. For instance, executing the statement DELETE FROM T1 WHERE VALUE >= 5; may lead to the removal of multiple tuples from . To handle the replication of deletions in another table , we can define a statement-level trigger as follows:
CREATE TRIGGER ST_REPL_DELAFTER DELETE ON T1REFERENCING OLD TABLE AS OLD_TFOR EACH STATEMENT -- all tuples considered at onceDELETE FROM T2 WHERE T2.ID IN (SELECT ID FROM OLD_T); -- no need to add where OLD_T.value >= 10
In this trigger, the REFERENCING OLD TABLE AS OLD_T statement allows access to the rows that have just been deleted. Since this is a statement-level trigger, it operates on the entire set of rows affected by the DELETE statement. As a result, all corresponding entries in can be removed without needing to evaluate each deleted row individually.
INSERT Event with Statement-Level Triggers
For INSERT operations, a statement-level trigger can also be used effectively. Suppose we want to insert multiple records into with the command:
To replicate these inserts in , we can define a trigger like this:
CREATE TRIGGER ST_REPL_INSAFTER INSERT ON T1REFERENCING NEW TABLE AS NEW_TFOR EACH STATEMENT -- all tuples considered at onceINSERT INTO T2 (SELECT ID, VALUE FROM NEW_T WHERE NEW_T.VALUE >= 10);
In this case, the trigger captures all new records being inserted into . It uses the REFERENCING NEW TABLE AS NEW_T clause to access the newly inserted rows. The SQL statement then selectively inserts records into , filtering for those with a VALUE greater than or equal to 10.
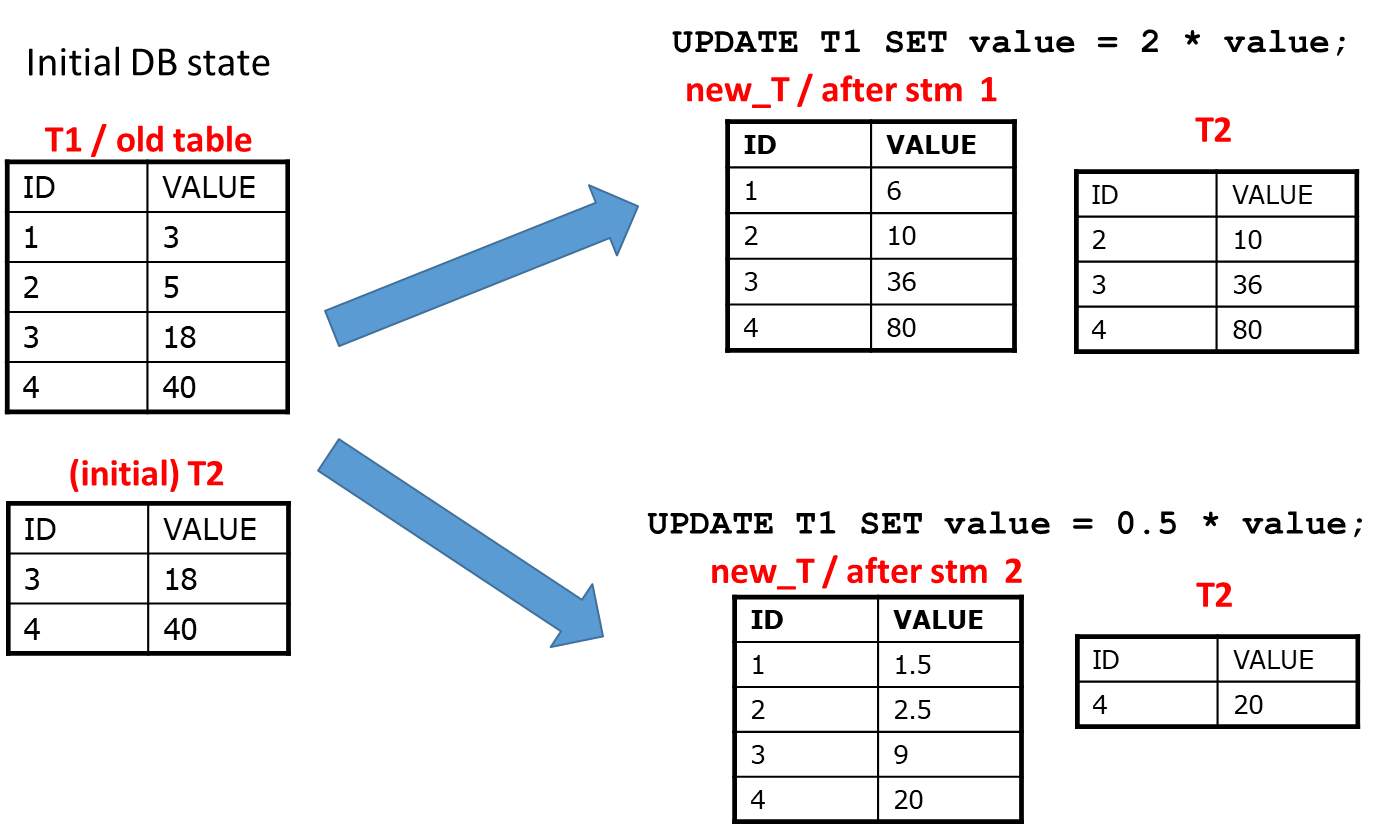
UPDATE Event with Statement-Level Triggers
Updating records can involve various transformations. For example, if we want to double the values in with the command UPDATE T1 SET value = 2 * value; and also apply a different transformation like halving the values with UPDATE T1 SET value = 0.5 * value;, we need to ensure that changes are reflected accurately in .
We can define a statement-level trigger for the UPDATE event as follows:
CREATE TRIGGER REPLIC_UPDAFTER UPDATE ON T1REFERENCING OLD TABLE AS OLD_T NEW TABLE AS NEW_TFOR EACH STATEMENTDELETE FROM T2 WHERE T2.ID IN (SELECT ID FROM OLD_T); -- delete all updated rowsINSERT INTO T2 (SELECT ID, VALUE FROM NEW_T WHERE NEW_T.VALUE >= 10); -- reinsert only relevant rows
In this example, the trigger operates in two stages.
First, it deletes any corresponding rows in that were affected by the update in , using the IDs from the OLD_T reference.
Then, it reinserts the updated values from NEW_T into , ensuring that only those with a VALUE of 10 or higher are included.
This approach ensures that remains synchronized with , reflecting any changes made during the update process.
Multiple Triggers on the Same Event
When multiple triggers are associated with the same event in a database, the SQL:1999 standard provides guidelines for their execution sequence. This sequence can vary based on the implementation of the DBMS, which might prioritize triggers by their definition time (with older triggers having higher priority) or by their alphabetical order.
The execution flow is typically visualized as follows:
This structured execution ensures that modifications are processed in a coherent manner, allowing for dependencies and constraints to be respected.
Cascading and Recursive Cascading
Cascading triggers can lead to complex and potentially problematic scenarios when multiple triggers respond to the same event. When multiple triggers are activated by the same event, the DBMS implements a precedence criterion to determine the order of execution. Different database vendors may have different policies regarding this precedence. Commonly, triggers that are delayed will be executed later, but the specifics can vary, making it challenging to predict the overall effect when multiple triggers interact.
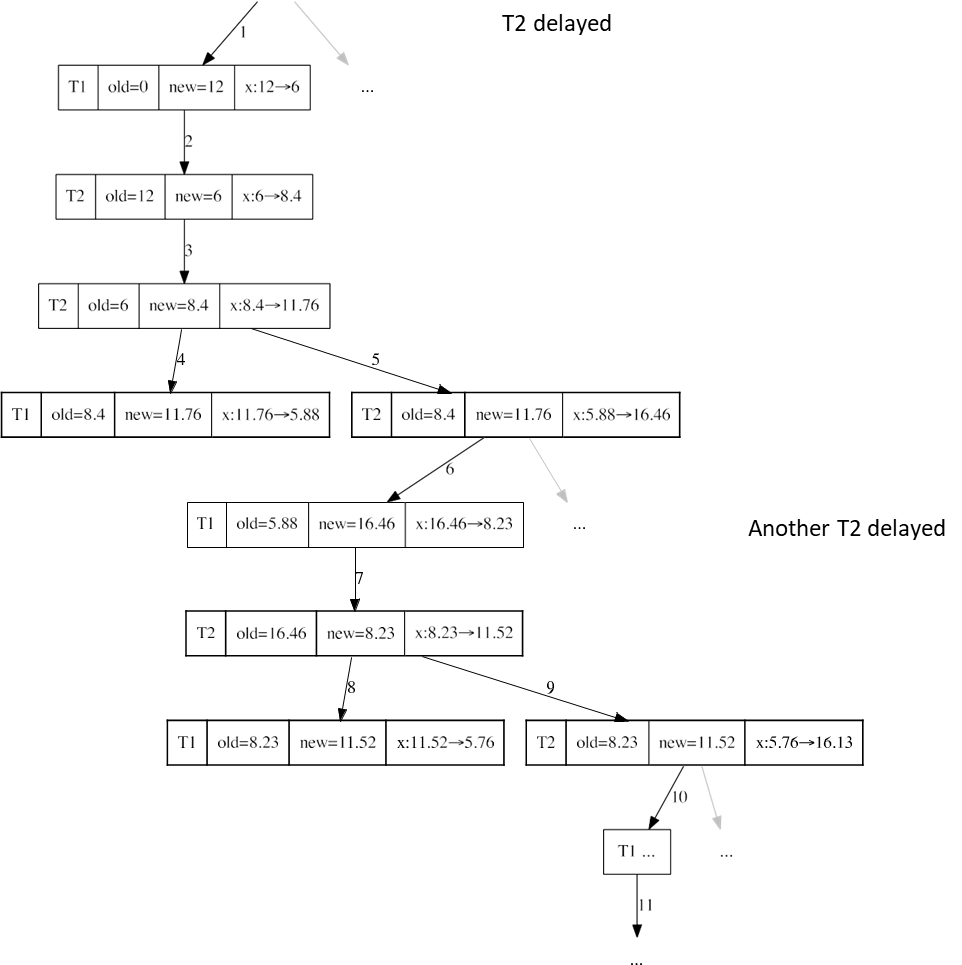
Postgres example
Consider a simple table ttest with just one attribute x. Two triggers are defined:
: halves x when x >= 10
CREATE TRIGGER T1 AFTER UPDATE OF x ON ttestFOR EACH ROW WHEN (NEW.x >= 10)UPDATE ttest SET X = new.x / 2.0;
: increases x by 40% when x >= 6
CREATE TRIGGER T2 AFTER UPDATE OF x ON ttestFOR EACH ROW WHEN (NEW.x >= 6)UPDATE ttest SET X = new.x * 1.4;
If we update x to the value 12, the following sequence of events occurs:
First, we update x to 12, which activates both triggers. takes precedence and halves the value of x. The execution of is delayed. The initial value of x was 0, and the update changed it to 12, so halves its value.
The change made by activates another instance of , which increases x by 40%, from 6 to 8.4.
Another instance of is executed, changing x from 8.4 to 11.76.
Now both and are activated, but takes precedence, halving the value of x, and is delayed. The process continues by executing the delayed instances of .
The current value of x is 5.88, but the “new” value that this instance of sees is still 11.76. Indeed, it is executed after step 4 but was activated after step 3. This execution changes x from 5.88 to 16.46.
The process continues indefinitely, and when the value of x becomes less than 6, we branch to execute a delayed instance of . The process never stops, and the system will eventually report an error.
Older, delayed instances of will never be executed.
As a consequence of this cascading execution, several issues can arise:
Infinite Loop: The cascading execution of triggers can lead to an infinite loop where oscillates between values. The system may eventually raise an error due to exceeding resource limits or other constraints.
Delayed Instances: Instances of triggers that are delayed can remain pending without execution, potentially leading to inconsistencies or unpredictable behavior if not managed properly.
Recommendations
Careful Design: When implementing triggers, ensure that their conditions do not lead to circular dependencies or infinite loops.
Testing: Rigorously test trigger interactions in various scenarios to identify potential issues before deploying changes to production systems.
Limit Trigger Scope: Where possible, limit the scope and impact of triggers to minimize the risk of cascading effects. This can include using WHEN clauses that reduce the likelihood of triggering multiple actions unnecessarily.
Use of Flags: Implement flags or additional state variables to control trigger execution and prevent repeated activations in response to cascading changes.
Termination Analysis
To prevent undesirable effects from recursive cascading, termination analysis is employed. This analysis verifies that for any initial state and any sequence of modifications, a final state will always be reached.
Definition
A useful method for conducting termination analysis is to construct a triggering graph, which is defined as follows:
Each trigger is represented as a node in the graph.
An arc from node to node exists if the execution of trigger can activate trigger .
graph LR
	i((i)) --> j((j))
If this triggering graph is acyclic, it guarantees that the system will eventually terminate. However, the presence of cycles in the graph does not automatically indicate that termination cannot occur; cycles may or may not lead to infinite loops, depending on the nature of the triggers involved. Therefore, while acyclicity is sufficient for termination, it is not a necessary condition.
Example
Consider a scenario where you need to manage a hierarchy of products, each with its own weight, and ensure that the total weight of a product reflects the cumulative weight of all its sub-products. This is a common requirement in inventory management systems, where products can have multiple variants or components. The Product table schema is defined as follows:
where:
ID: A unique identifier for each product.
SuperProduct: Refers to the ID of the product’s parent or “super-product.” A root product, with no parent, has SuperProduct set to NULL.
OwnWeight: Represents the product’s intrinsic weight.
TotalWeight: Reflects the cumulative weight, incorporating the OwnWeight and the weights of all its sub-products.
The goal is to maintain consistency in the TotalWeight field as users perform operations like adding, deleting, or reassigning products.
In this hierarchy, maintaining the TotalWeight ensures that each product reflects its cumulative weight accurately, facilitating operations on hierarchical data.
Users can perform the following operations on the Product table, each of which affects the hierarchical weight calculation:
graph LR
    T1((T1)) --> T3((T3)) --> T3
    T2((T2)) --> T3
    T4((T4)) --> T3
Trigger 1: insertion of a new product (user event) by setting the total weight of it.
Trigger 2: deletion of a product (user event) by subtracting the product’s weight from its super-product (we need to ensure that SuperProduct is not NULL).
Trigger 3: update of an existing product’s weight (trigger event) by updating the TotalWeight of the super-product.
Trigger 4: update of a product’s super-product (user event) by decreasing the total weight of the previous super-product and increasing the total weight of the new super-product if not null. We need to ensure that SuperProduct is different from the previous super-product.
Trigger 1: Set Total Weight After Product Insertion
The first trigger, product_AFTER_INSERT, sets the initial TotalWeight of a new product to match its OwnWeight. This trigger is invoked after a product is inserted, ensuring that products start with a TotalWeight that reflects only their own weight, as they do not yet have sub-products.
CREATE TRIGGER product_AFTER_INSERTAFTER INSERT ON ProductFOR EACH ROWBEGIN UPDATE Product SET TotalWeight = OwnWeight WHERE ID = NEW.ID;END;
This mechanism initializes the TotalWeight correctly, setting the stage for further updates if the product later becomes a super-product with nested sub-products.
Trigger 2: Adjust Total Weight After Product Deletion
The second trigger, product_AFTER_DELETE, decreases the TotalWeight of a super-product when a sub-product is deleted. This trigger fires after a delete operation and applies only if the deleted product has a super-product (SuperProduct is not NULL).
CREATE TRIGGER product_AFTER_DELETEAFTER DELETE ON ProductFOR EACH ROWWHEN OLD.SuperProduct IS NOT NULLBEGIN UPDATE Product SET TotalWeight = TotalWeight - OLD.TotalWeight WHERE ID = OLD.SuperProduct;END;
Here, the TotalWeight of the super-product is reduced by the TotalWeight of the deleted sub-product, preserving the accurate cumulative weight in the hierarchy.
Trigger 3: Propagate Weight Changes to Super-Products
The product_AFTER_UPDATE_TOTALWEIGHT trigger is designed to handle updates to the TotalWeight of a product and propagate these changes up the hierarchy to its super-product. This trigger only fires if the TotalWeight changes and the product has a super-product.
CREATE TRIGGER product_AFTER_UPDATE_TOTALWEIGHTAFTER UPDATE OF TotalWeight ON ProductFOR EACH ROWWHEN NEW.SuperProduct IS NOT NULL AND NEW.TotalWeight != OLD.TotalWeight -- remember the 3-valued logicBEGIN UPDATE Product SET TotalWeight = TotalWeight + (NEW.TotalWeight - OLD.TotalWeight) WHERE ID = NEW.SuperProduct;END;
This ensures that any change in a product’s TotalWeight (such as when a sub-product is added or removed) is accurately reflected in the TotalWeight of its super-product, allowing the hierarchy to maintain integrity.
Trigger 4: Adjust Weights After Changing Super-Product
Finally, product_AFTER_UPDATE_SUPER manages changes in the SuperProduct field itself. When the parent of a product changes, this trigger updates the weights of both the old and new super-products to reflect the reassignment.
CREATE TRIGGER product_AFTER_UPDATE_SUPERAFTER UPDATE OF SuperProduct ON ProductFOR EACH ROWWHEN NEW.SuperProduct IS NULL OR NEW.SuperProduct != OLD.SuperProductBEGIN UPDATE Product SET TotalWeight = TotalWeight - OLD.TotalWeight WHERE ID = OLD.SuperProduct; UPDATE Product SET TotalWeight = TotalWeight + NEW.TotalWeight WHERE ID = NEW.SuperProduct;END;
This trigger decreases the TotalWeight of the old super-product by the moved product’s TotalWeight and adds this weight to the new super-product, thus preserving the cumulative weights across the hierarchy.
Additional Considerations
Deletion of Sub-Products: The deletion of sub-products related to a deleted product is managed by referential integrity using ON DELETE CASCADE. This ensures that when a product is deleted, all its sub-products are automatically removed from the database.
Cascading Updates: The triggers are designed to ensure that any changes in product hierarchy or weights are propagated throughout the hierarchy, maintaining accurate total weights for all products.
How Real Systems Work
Different DBMSs have distinct rules and behaviors regarding triggers, especially concerning cascading effects and termination:
MySQL: In MySQL, a stored function or trigger cannot modify a table that is currently being used by the statement that invoked the trigger. This restriction helps prevent direct recursive triggers from causing issues.
PostgreSQL: PostgreSQL allows cascading triggers, meaning that executing SQL commands in a trigger can fire other triggers. There is no set limit on the number of cascading levels, but the responsibility lies with the trigger programmer to prevent infinite recursion.
Microsoft SQL Server: SQL Server supports nested triggers, allowing triggers to initiate other triggers. The nesting is limited to 32 levels, and an AFTER trigger will not call itself recursively unless the RECURSIVE_TRIGGERS option is explicitly set.
Oracle: In Oracle, triggers that fire as a result of other triggers are considered cascading. Oracle allows up to 32 triggers to cascade simultaneously. The parameter OPEN_CURSORS can effectively limit the number of cascades, as a cursor must be opened for every execution of a trigger.
Example: Book Sales
This scenario involves managing data consistency across several interconnected tables in a relational database. Specifically, it focuses on maintaining accurate book sales data for both individual books and their respective authors by using SQL triggers. In this case, we have three main entities: books, authors, and the relationships between them.
The relational schema for these entities consists of three tables—BOOK, WRITING, and AUTHOR—each of which plays a crucial role in the overall system.
Goal
The primary goal of this schema is to keep the SoldCopies attribute in the AUTHOR table up-to-date based on changes to book sales data in the BOOK table and new entries in the WRITING table, which represents the relationship between authors and their books.
This setup enables a structured approach to handling sales data, as it provides the foundation for creating triggers that ensure automatic updates and consistency.
Trigger Mechanism for Sales Consistency
SQL triggers play a vital role in ensuring that the SoldCopies count in the AUTHOR table remains accurate when updates occur in related tables. Each trigger responds to specific events—such as updates or inserts—on designated tables and executes predefined actions to maintain the integrity of the data.
Trigger 1: Updating Author Sales After Book Sales Update
The first trigger, UpdateSalesAfterNewSale, is responsible for updating the SoldCopies attribute of authors when the sales count of a specific book changes. This trigger is activated by an AFTER UPDATE event on the SoldCopies field in the BOOK table. Its function is to keep the total SoldCopies in the AUTHOR table accurate, based on changes in the sales data of individual books.
The logic behind this trigger can be broken down as follows:
Steps
When a sale occurs and the SoldCopies attribute in the BOOK table is updated, the trigger calculates the difference between the new and old sales values (NEW.SoldCopies - OLD.SoldCopies).
It then updates the cumulative SoldCopies for any authors associated with that book, using the WRITING table to identify those authors.
This ensures that only the affected authors’ total sales count is adjusted, preserving accuracy without redundant updates.
CREATE TRIGGER UpdateSalesAfterNewSaleAFTER UPDATE OF SoldCopies ON BOOKFOR EACH ROWUPDATE AUTHORSET SoldCopies = SoldCopies + NEW.SoldCopies - OLD.SoldCopiesWHERE Name IN (SELECT Name FROM WRITING WHERE Isbn = NEW.Isbn);
The SoldCopies in AUTHOR does not directly match the SoldCopies in BOOK. Instead, it represents the sum of sales across all books attributed to the author, making this trigger essential for maintaining aggregate accuracy.
Trigger 2: Updating Sales After New Authorship
The second trigger, UpdateSalesAfterNewAuthorship, ensures that when a new author-book relationship is introduced (such as co-authorship or re-attribution of an existing book), the author’s total sales count in the AUTHOR table is updated to include the SoldCopies for that book. This trigger is activated by an AFTER INSERT event on the WRITING table, reflecting new associations between books and authors.
Upon execution, the trigger retrieves the SoldCopies value from the BOOK table for the new entry’s ISBN and increments the corresponding author’s total sales count in the AUTHOR table by this amount. This prevents discrepancies by accounting for all books an author is associated with, including newly added or reassigned books.
CREATE TRIGGER UpdateSalesAfterNewAuthorshipAFTER INSERT ON WRITINGFOR EACH ROWUPDATE AUTHORSET SoldCopies = SoldCopies + (SELECT SoldCopies FROM BOOK WHERE Isbn = NEW.Isbn)WHERE Name = NEW.Name;
Through this process, the system guarantees that when new relationships are created, the AUTHOR table’s SoldCopies accurately reflects the author’s cumulative sales, integrating all associated books.
It may initially seem necessary to create triggers for handling insertions into the BOOK and AUTHOR tables. However, due to referential integrity constraints within the relational schema, there is no need for such triggers. In this schema, entries in the WRITING table rely on the existence of records in both the BOOK and AUTHOR tables. Therefore, before any relationship is established in the WRITING table, both the book and author must already be present. This design naturally prevents inconsistency, as there will never be an orphaned relationship requiring post-insertion correction in the BOOK or AUTHOR tables.